DIY Secret Door Bookcase
DIY FULL SIZE HIDDEN DOORWAY BOOKCASE
LET’S MAKE A SECRET ROOM
Bookcase Door Front
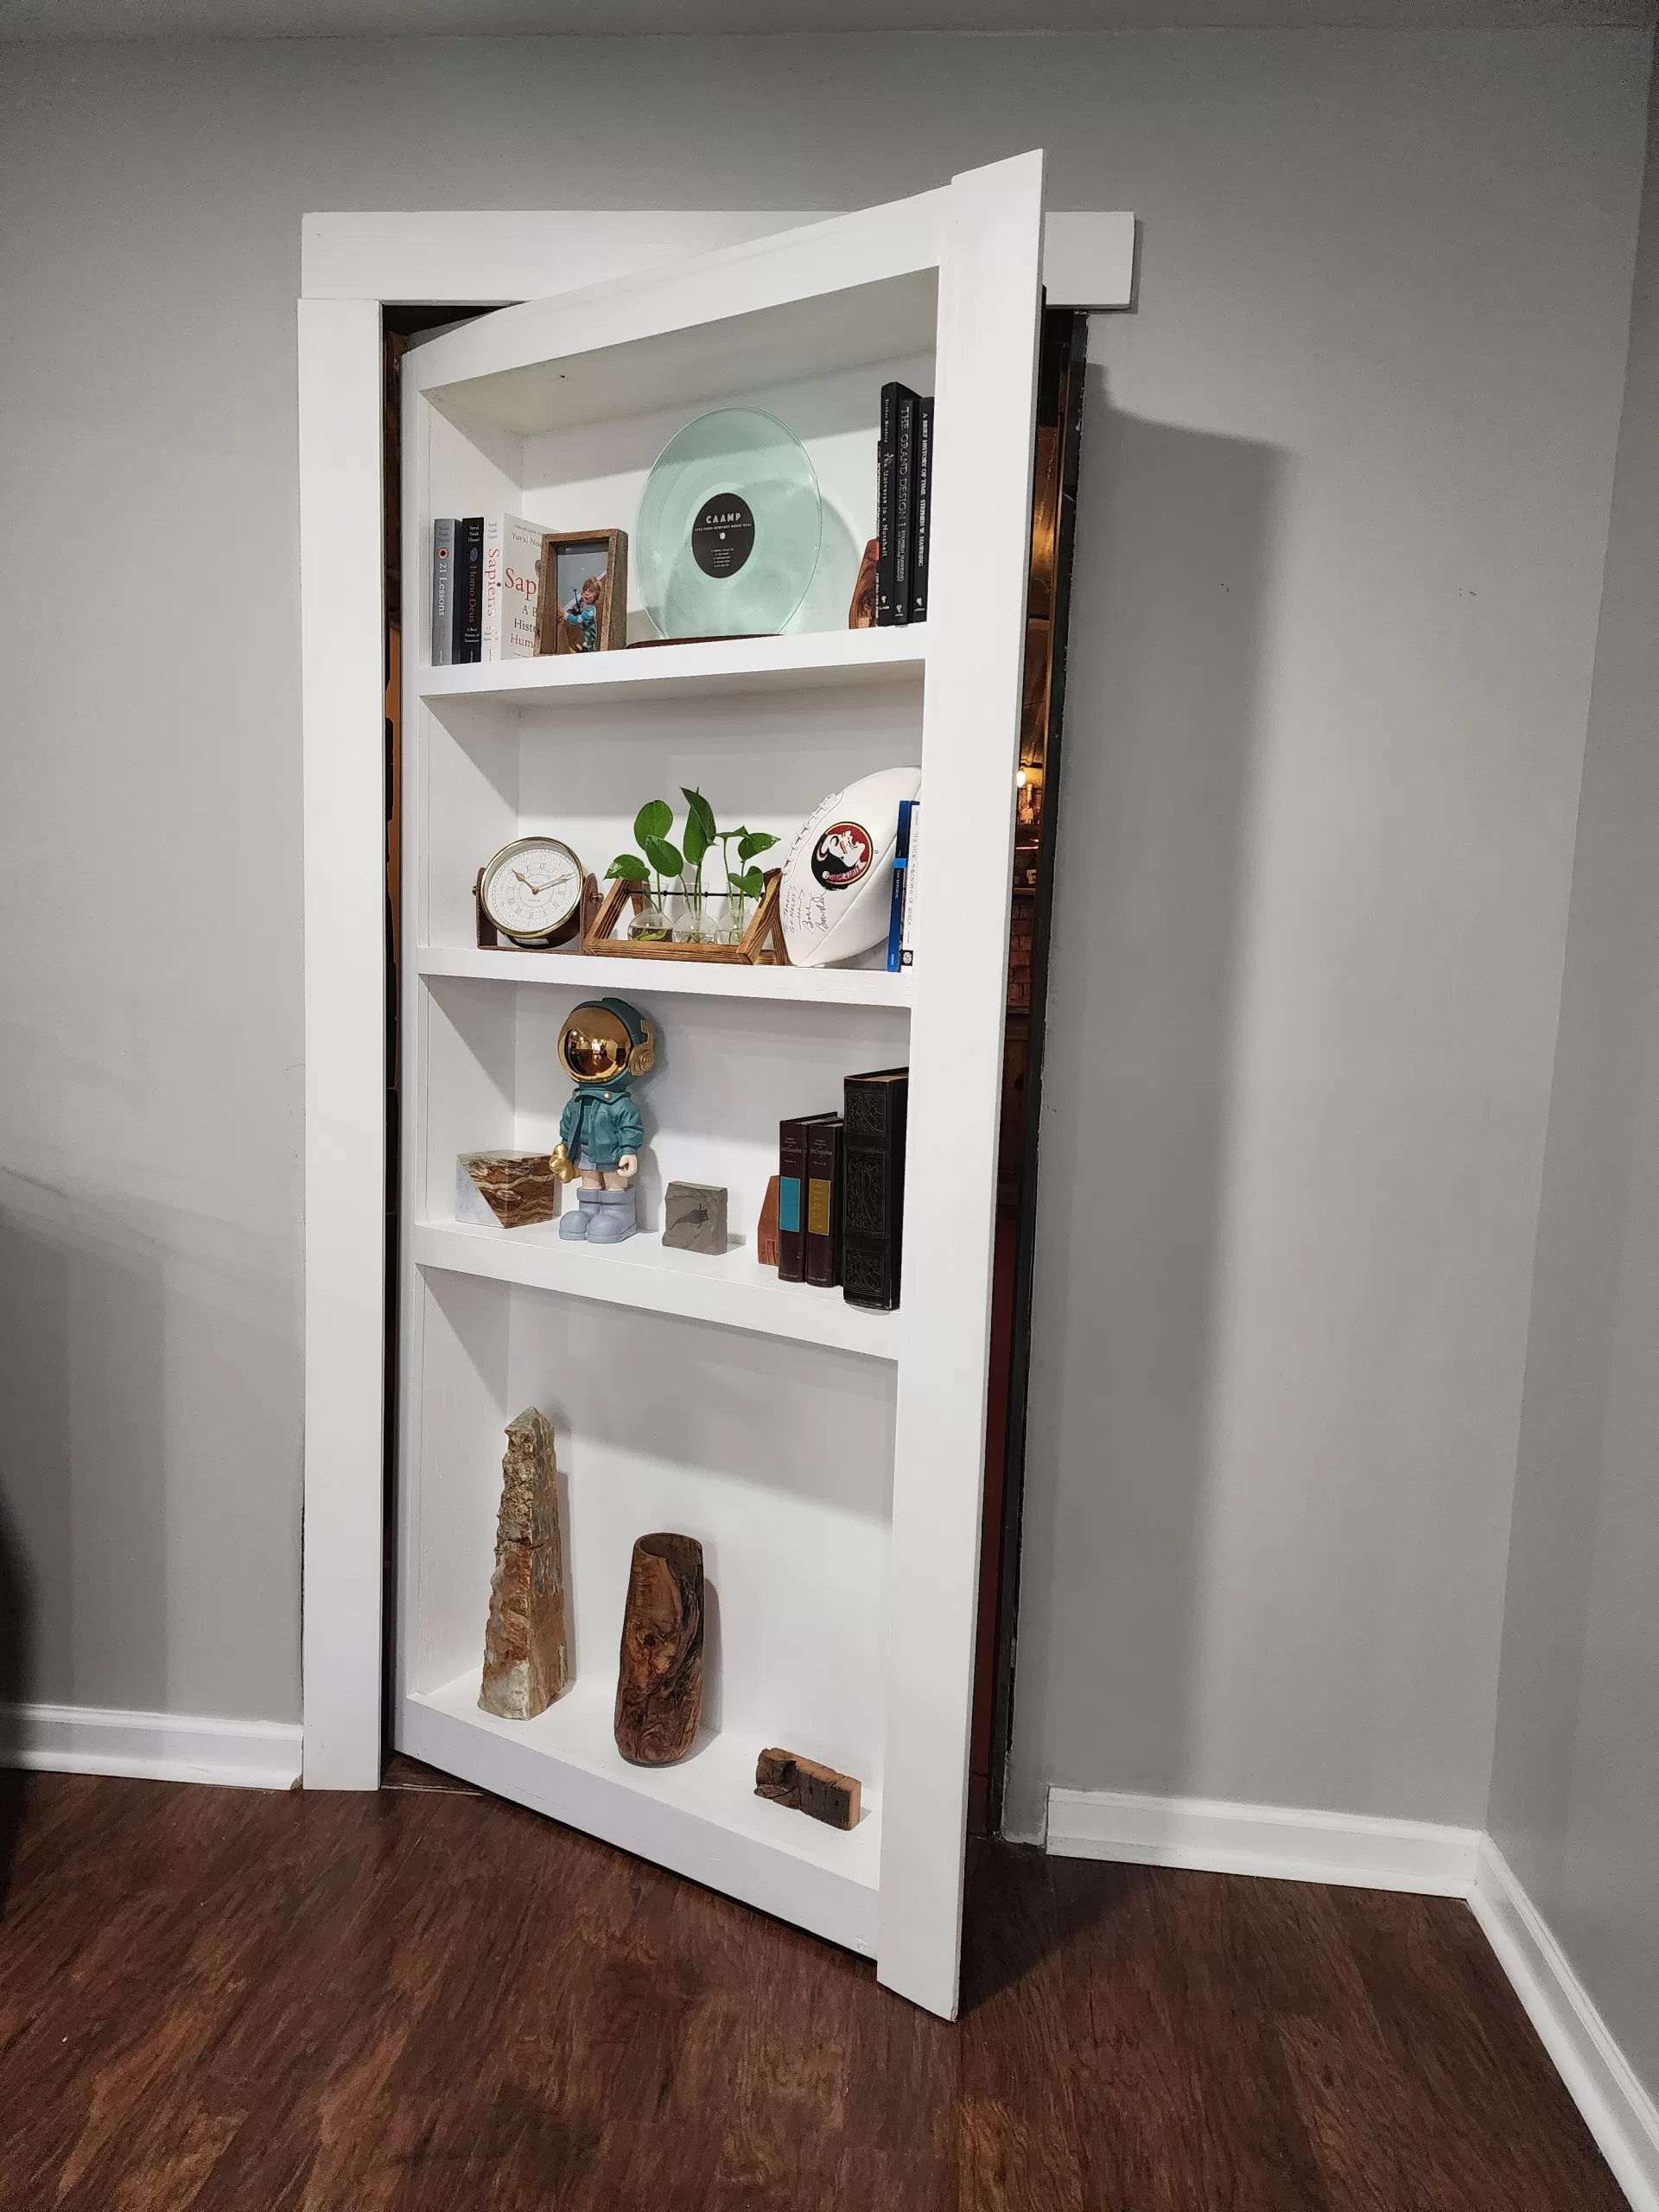
Bookcase Door Back
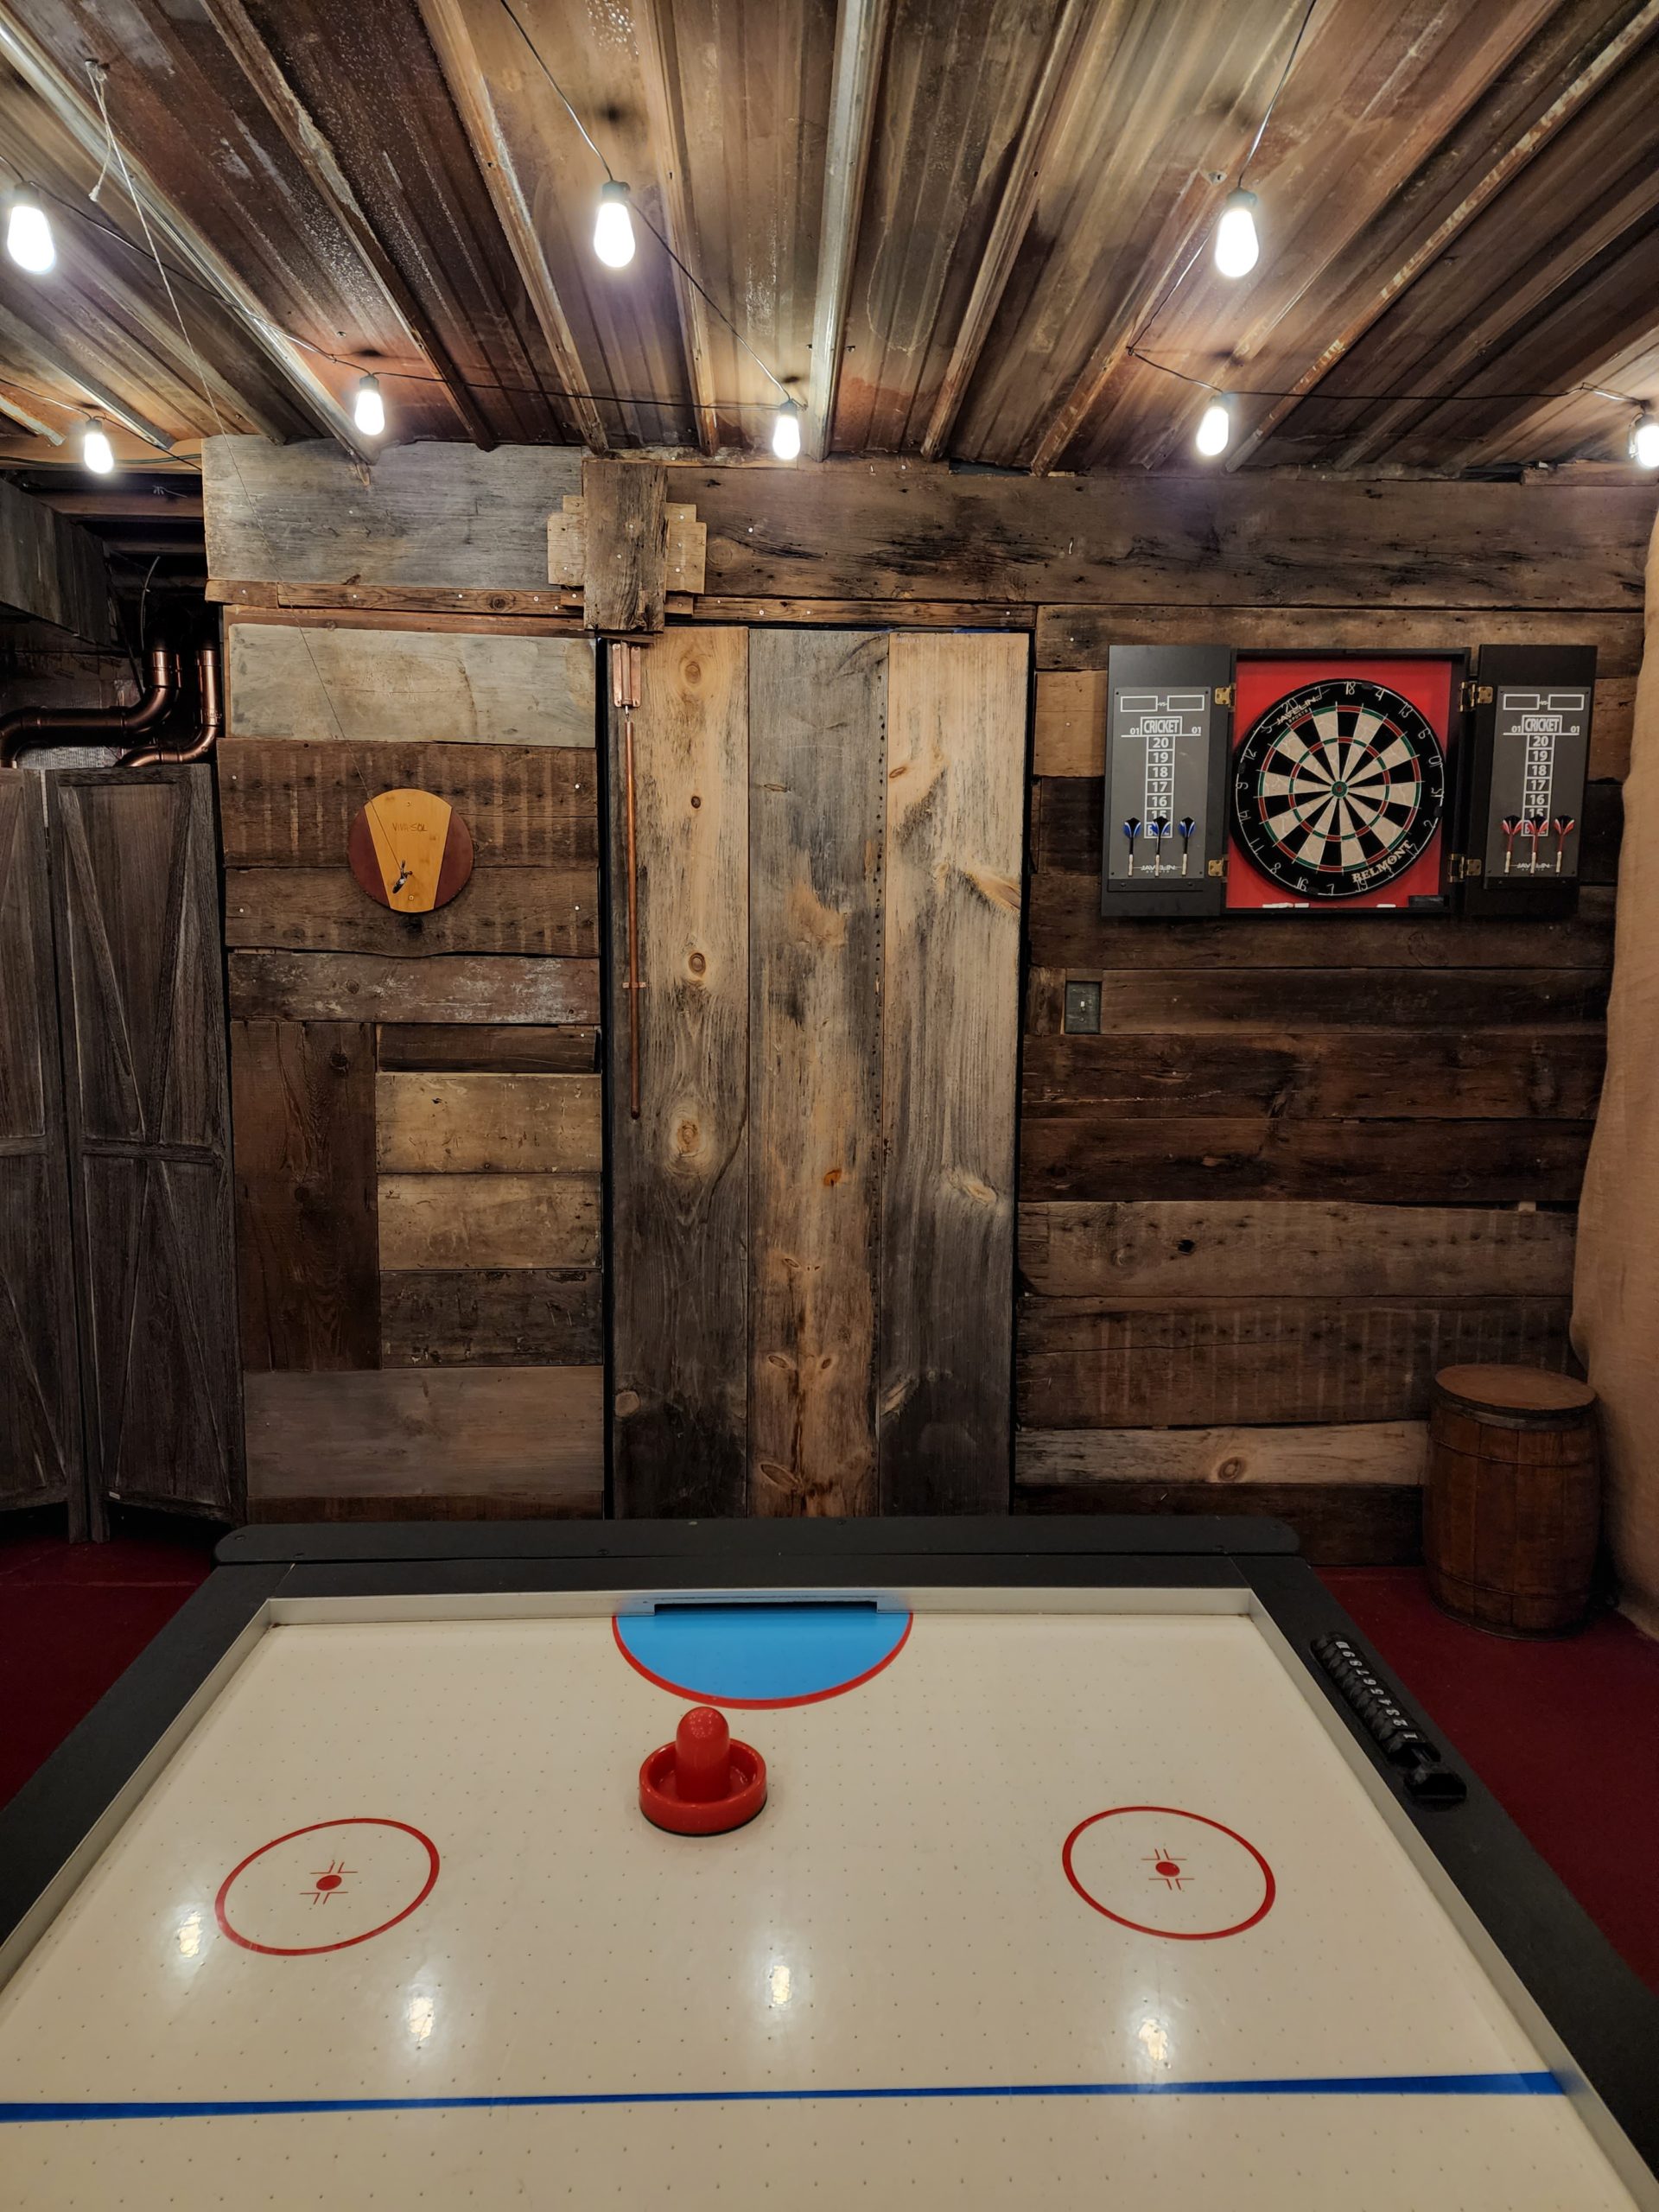
Arcade

Full Size Hidden doorway bookcase Plans –
Let’s make your Door Cool
A buddy of mine has a Murphy Door bookshelf in his basement. Aka a bookshelf with a secret door. I was blown away by the design, how it converted a door to a utility room into a awesome secret passage. I asked, how do you make a hidden bookcase door? The next of course being, How much are secret bookshelf doors?
He told me that his was a Murphy Door Bookcase and after learning the cost of their finished models I went to the next logical and frugal question, How do you make a hidden bookcase door? Instructions out there were vague but after researching how much a secret door cost to make I became hooked (hint, it wasn’t that bad!). A bookcase with hidden door is an awesome way to separate a space.
I debated for months about building one on my own outswing hidden bookcase door and scoured the internet for outswing hidden door plans as well as hidden door ideas. I looked up the cost of multiple kinds of hidden door kits, from budget hidden door bookshelf ikea designs to elaborate solid oak builds. I kept adding finished versions of the bookshelf door into my cart then removing them, a vicious cycle. Most of the videos online were for smaller attic style doors and while they were helpful, I found it difficult to find comprehensive instructions on full size secret door conversions, similar to the Murphy door.
I decided that the design wasn’t too complicated, my budget minded brain could not justify the markup that companies were charging for finished hidden bookcase doors. I literally sold my N64 Gold Ocarina of Time cartridge to pay for the material, for you non nerds – that is about $300 (best game of all time though). Murphy doors that compare in design and finish are well over $1,000.
I had never cut a dado, ripped a board with a table saw, or drilled more than a handful of pocket holes but I was determined to get what I thought was the coolest door in the business – I documented the entire process so that I could help people like you do the same. I hope that you find this article helpful. If you do, feel free to send over pictures of your door. I would love to feature them here or on our IG account (@thecraftycatsman). Enough of the background, lets go create a secret room with a bookcase door!
How to Build a bookcase that is actually a hidden door. Budget Friendly too!
I am extremely happy with the end result and I am glad that we went the DIY secret door path. Ayda and I had so much fun building it. She was a part of almost every step and she is always so proud to show it off. We are in the process of building out the hidden arcade that this secret door opens up to. I will post more on that later.
The DIY hidden doorway bookcase takes time but can easily be broken up into fun, small and rewarding steps. The key is in the hidden door hinges and hidden door hardware – more specifically, the hidden door latch.
Note: I mentioned that I looked specifically for outswing hidden door plans (more specifically, a right-hand outswing door). That being said, the below instructions will work for both outswing and inswing hidden door – the key is in the hinge as well as the placement of the molding. We will get into that later in the write up but just know that regardless of outswing or inswing, these instructions will work!
I hope that these hidden bookcase door plans help you in your process. If you have any questions, please feel free to reach out to me – thecraftycatsman@gmail.com
Hidden Doorway Bookcase.
Disclaimer
I understand that this project may not be for everyone and that the build can be daunting to say the least. I have spoke with SO many people about my build and appreciate all of the feedback, kind words and success stories. Together, we have made this one of the top ranking DIY Bookcase Door builds on the internet! Really cool stuff.
Murphy Door and I decided to end our partnership on amicable terms, in short they are just spread too thin to support content creators. I encourage all of you to check the video below out as I walk through five tips to get your started. Subscribe to our YouTube channel to stay up to date.
View Transcript
Hey Guys, It’s Jeremy from the CraftyCatsman.com. reporting in from the speakeasy arcade. A bar that I built in my basement for less than a contractor wanted to charge just to put up studs and drywall. Now it didn’t always look like this, when we moved in, my wife got the office and I got to do whatever I wanted with this storage area. My website walk you through each step that I took to take it from this…to this.. on a budget Now, I have helped hundreds of people build their own bookcase door. In fact, my free step-by-step instructions will guide you through the entire process. I even have a whole section dedicated to what I consider the most underappreciated part of any bookcase door….the back (B-Roll of footage of the back). Insert Audio Clip: I’ll link to those instructions below. Audio Clip Title “Link Those Instructions”. Today, we are going to cover the top 5 tips that I have to help you decide whether you should build or buy your bookcase door. ( Stick around to the end where I will cover some common questions about my build and I will also show you a bit more of the arcade. Need to add video/audio for this at the end – I may remove this and I may ask you to edit this out. –update 11/06 – I am pretty sure that this should be edited out. Buying or Building A Bookcase Door is a decision that I mulled over for months, if you have done some research, then you probably have heard of Murphy Door they sell everything from doors that you have to put together to pre-hung door kits that can be put together in a matter of hours. I must have added and removed different murphy doors from my cart a dozen times. I love Murphy Door...In fact, they are the reason I got interested in bookcase doors in the first place. A buddy of Mine had one in his Basement and I immediately fell in love. Sleek, simple with a ton of great reviews. Murphy Door had me hooked. To show that they like me as much as I like them they have decided to offer those of you who decide not to build a door 10% off your entire purchase just use the Code CRAFTY10 at checkout (Text overlay of the word “CRAFTY10”), and you’ll get 10% off your entire order. Me and Murphy share a common goal, to get you a statement piece that truly transforms your space. My tips are designed to help you make an educated decision and to help along the path to the door of your dreams. So without further ado let’s jump in. 1. Be real about your budget Let’s face it, for most the feasibility of getting a bookcase door comes down to price. With a higher cost comes convenience and some sweet options too, (Show B-Roll of Different High End Murphy Door set ups). If you are on a budget, DIY the clear winner. I was able to build this entire bookcase doorfor less than a gold Ocarina of time cartridge (show a picture of my actual gold ocarina of time with the text "my actual gold ocarina of time For my non nerdy friends, that's about $350. (insert b roll of the Zelda sound and bookcase door). So for under $350 you can build your door and customize it too. Heck there are ways to cut costs and do it for $100 on the flip side, Murphy has a ton of options (B-Roll of Murphy Door Options). Some of those options come at a premium, but that premium has it’s perks. 2: Determine if you're really interested in DIY This is in my opinion, the most important part of this entire video. If you are even a little bit interested in DIY projects, I want to shamelessly try and convince you to build your own door. DIY projects are fun and extremely rewarding. I started my journey on a balcony building really, really bad planters. I told my then girlfriend and now wife that if I could build a rectangle then I could build anything. That's a stretch but the message is important. DIY can be as simple as meticulously following instructions. Any project can be broken up into simpler smaller steps and if you can be patient, you can build wonderful things - like this bookcase door I want to drive this point home. Building a door takes discipline and determination but it doesn’t require a degree. If fear is the only thing holding you back, don’t let it get the best of you. Fear aside, there are plenty of other reasons why you may not want to build your own door There is one reason that you may think is a negative but I will advocate as a positive here in the next tip.,.. 3: Do a Tool Assessment Now there are some power tools that make this easier, like a miter saw and a table saw If you don’t have those tools, that’s okay. A circular saw will do just fine for both of them., However, if you were on the fence about buying one of those tools. Now might be a great time to make that purchase, build the door and still end up ahead. I did the same calculation, I wanted a table saw and I decided that the cost of the table saw plus the cost of the build was still cheaper than going with Murphy Door. It was close, but I knew that I was going to use that table saw in the future and it was worth the investment. I want to pause here for a second to speak about something dear to me. We have all heard it. “SMASH THE LIKE BUTTON” Smash itCrush it, take it out to the curb and stomp its teeth out For like buttons everywhere I am advocating for TLL Tender Lovin’ Likes. If you are finding this video helpful in any way, please gently push the like button, hard enough to record it but none the harder. This is my first video in a series of videos that im dedicating to both the bookcase door and the speakeasy behind it. I have step by step on the website, but the more likes and subscribes I get the faster I will bring that content here to youtube. Let’s get back to it. 4: Check your Space I love Tetris I have a natural knack for finding space. If your considering a bookcase door build then consider that most of this is going to happen away from the doorway. That means if you have any safety concerns to address, you need to plan ahead. In short, you want the ability to work on your project in a space that can hold the project for as long as you need it. For an experienced woodworker this can be a weekend, for most of us this can be weeks or months. Virtually all projects require precision, but bookcase doors leave little room for error and if you don’t have the space to work on one, you may cut some corners and ruin the project. 5: Research and decide on your look At it’s core, from a woodworking prospective my bookcase door is actually pretty basic. It’s well, a series of rectangles Yeah, there’s some google home integration, custom sound and what I consider the prettiest back in the business but at it’s core it’s pretty simple. I love the look of my door and for my space it is exactly what I want, but you may be interested in a more elaborate door, a door that might be even more challenging to build on your own. I mean, Murphy Door sells Flush mount doors like mine, but they also offer mirror doors, pool cue doors, shoe rack doors, spice rack doors, wine rack doors, pantry doors, French dresser doors. hamper doors and even more doors than that. These specific Door types are unique and may fit your needs better. You can build similar but it will be more challenging. Conclusion: Building a Bookcase door can be an extremely rewarding project. To date, it is one the most exciting projects that I have ever taken on myself and theallure has not faded a single bit. That being said, the time required and personal preferences of yours may lead you to just buy your own door and that’s perfectly fine. I love Murphy Door and as a reminder, use the code TheCraftyCatsman at checkout and get 10% off your entire order (Text overlay of the word “CRAFTY10”),. We truly appreciate those of you who stuck around until the end of this video. We have a ton of content on our website and we’re just beginning to move that over to Youtube, we think that will resonate with you. If you agree, like and subscribe. Put a comment below and let me know what part of the arcade you want to see next. Thanks for stopping by: Catch you all on the next one.
Hidden Doorway Bookcase.
Table of Contents

Categories and Difficulty
Every Project is ranked by Tool Category and Difficulty Level.
Click below to learn more


House Cat
Hidden Doorway Bookcase.
Tools
If you click through any of the below links then I may receive a small compensation from Amazon, even if you go on to buy something else. This is a great way to support the site without actually sending me money :).
Hidden Doorway Bookcase.
Materials

Pipe, 90 degree elbow and Tube Strap
Hidden Doorway Bookcase.
Master Cut List
These measurements are based off of a 36″ door opening.
Door opening (casing):
Casing – 3.5″ – 4″ flat stock
Frame:
- Two 1 1/2″ x 78 1/2″ stiles (3/4″ prime board from Home Depot)
- Two 2 1/4″ x 31 3/4″ rails (3/4″ prime board from Home Depot)
- Two 1 1/2″ x 31 3/4″ rails (3/4″ prime board from Home Depot)
- One 3 1/2″ x 31 3/4″ rail (3/4″ prime board from Home Depot)
Case:
- Sides and Shelves: 1 sheet of 3/4″ plywood or MDF. I used plywood but I may try MDF on my next project. If you intend on painting the bookcase then it really doesn’t matter. In fact, the smooth finish of the MDF will save some filling and sanding at the end of the project.
- Back: 1 sheet of 1/4″ plywood
Hidden Doorway Bookcase.
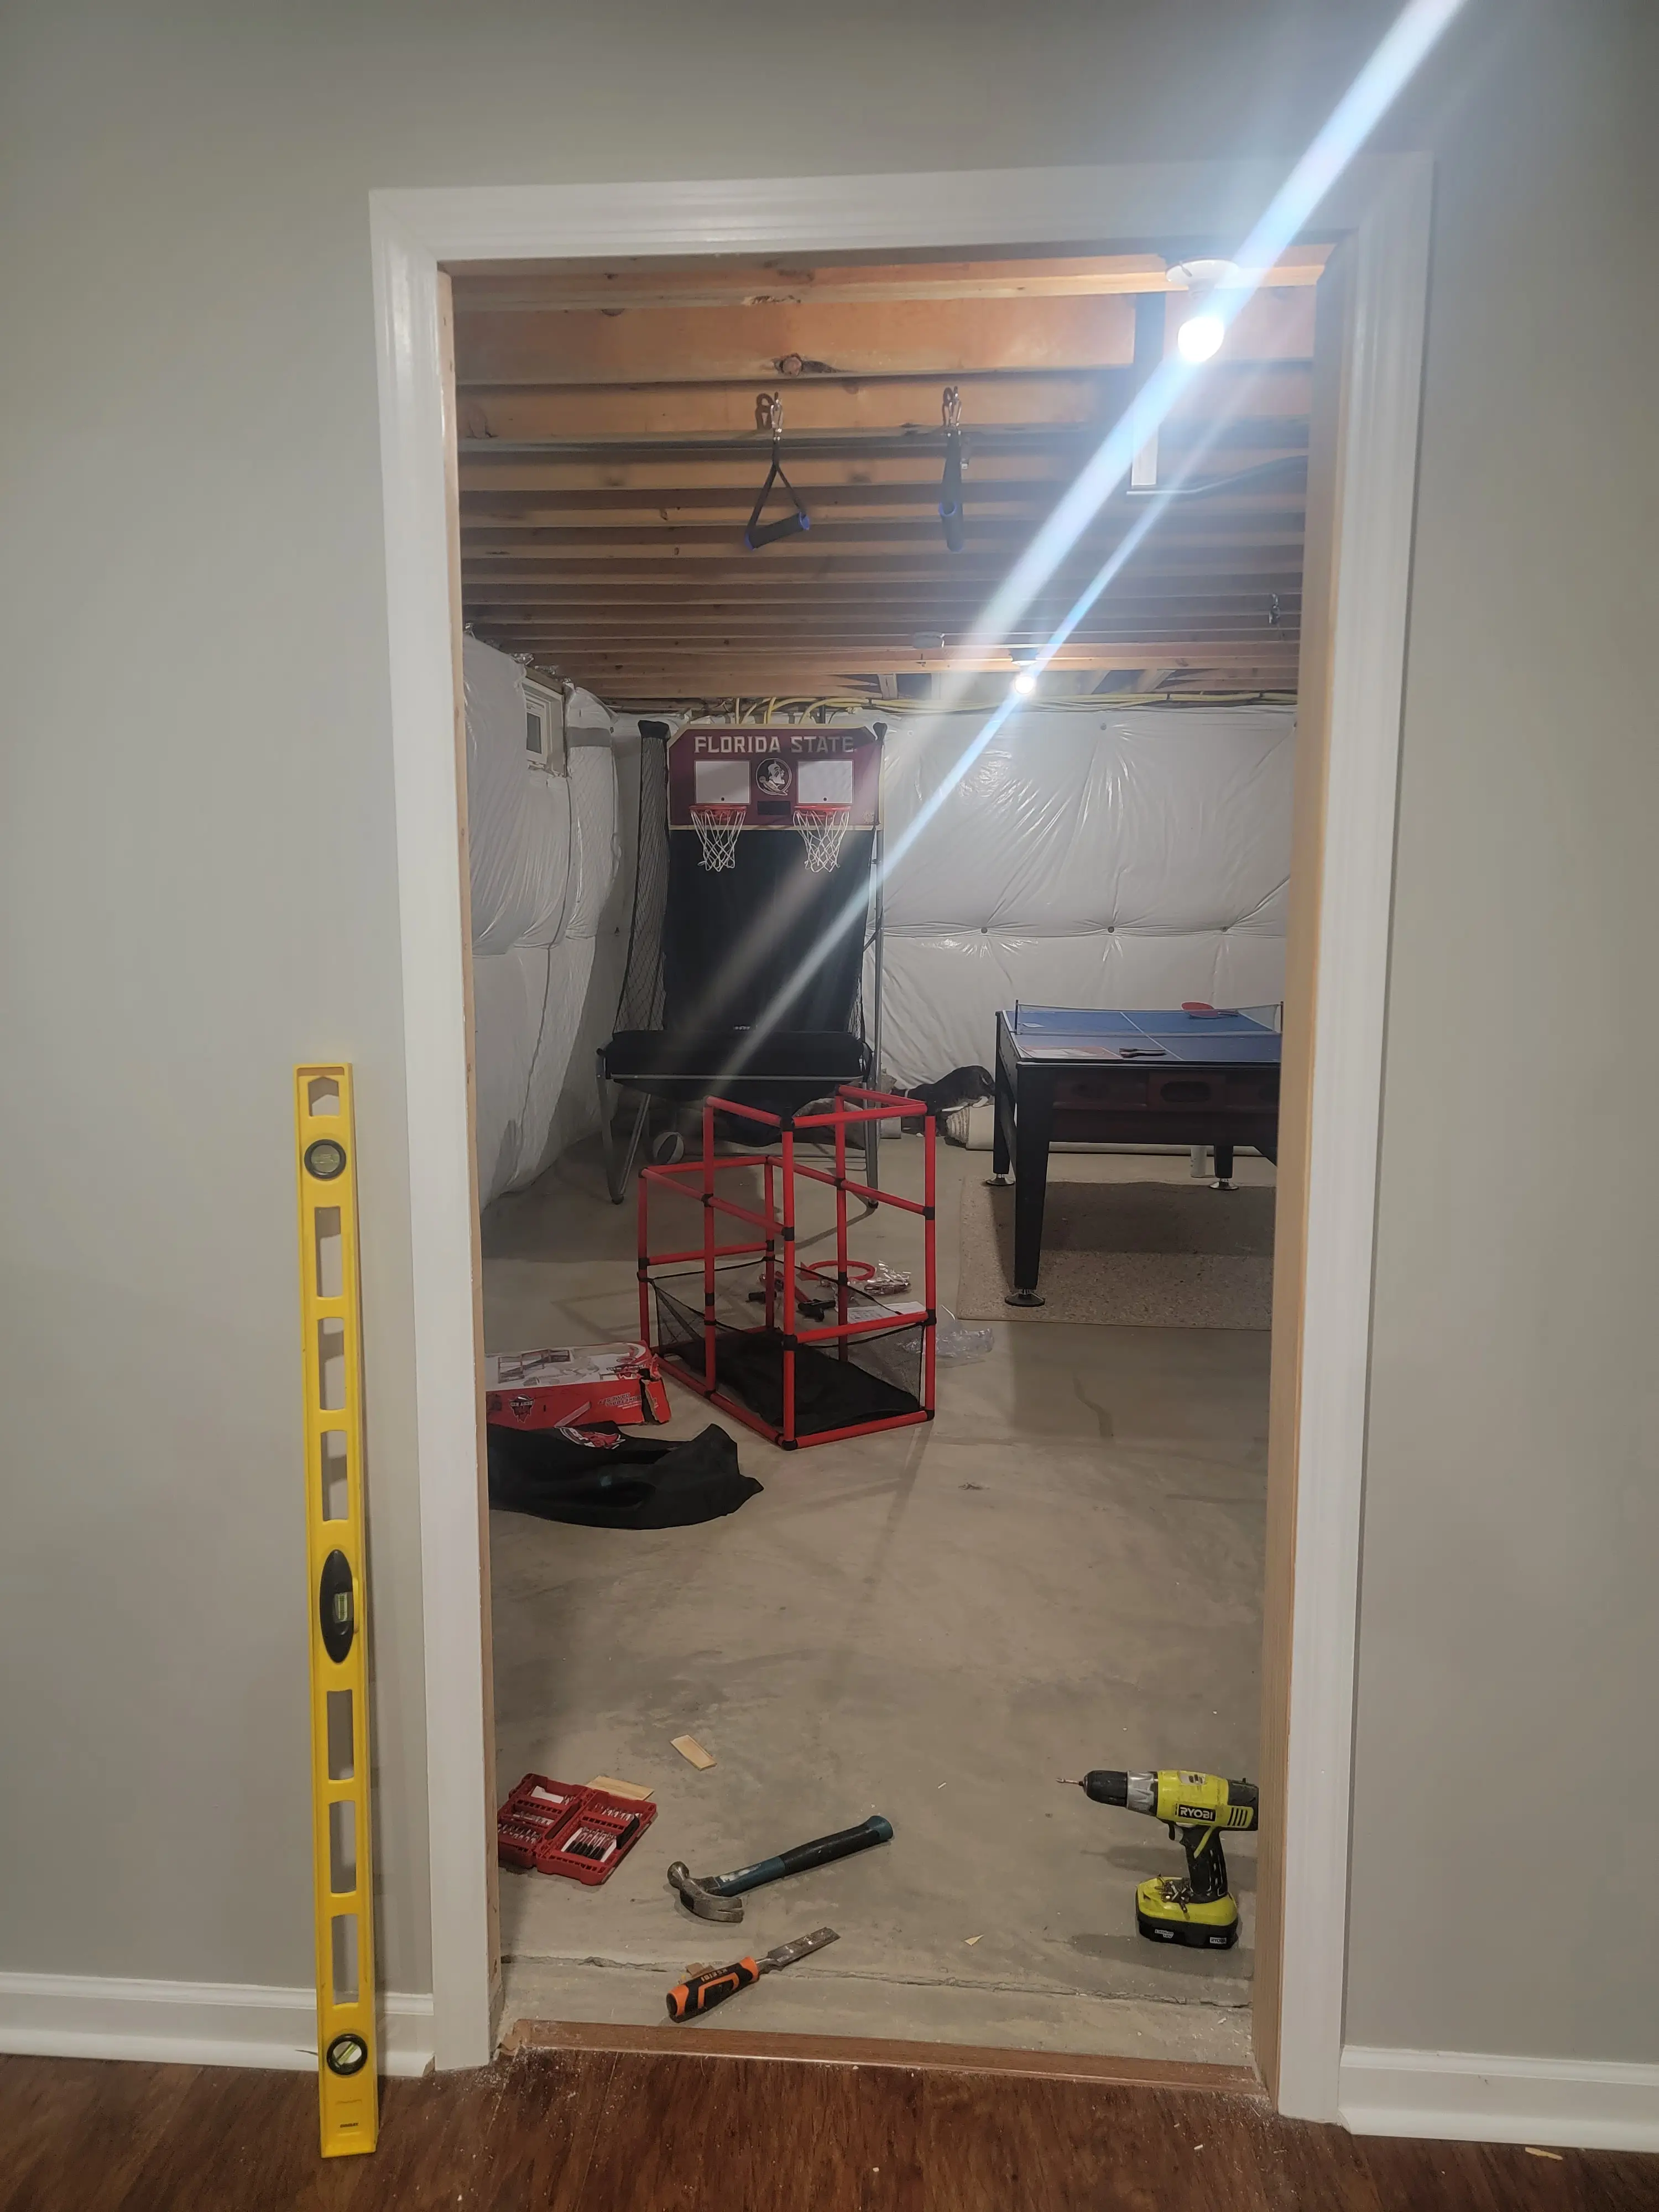
Remove the old, not secret, boring door
You have browsed hidden door ideas, decided that the murphy door bookcase door kit wasn’t for you and are ready to emMeow (embark) on this project. Let’s get that old door off and get started!
Let’s get this party started! You will never look at doors the same again. Remove that old traditional door and door hardware and set it aside, it’s time for a hidden bookcase door. There are plenty of people that will buy a used door on Facebook.
Hidden Doorway Bookcase.
Case, Plumb and Square the Door
Virtually every step in this DIY secret door project will require careful planning and specific measurements. It’s one big fun math equation. I will say this here, but it applies to all other steps – take your time and plan. You will save yourself hours of fixing later on in the project. Doors do not offer a lot of room for error and the saying “measure twice cut once” might be a little conservative for this project.
If your casing is not level and plum then the door will never open and close properly.
The hidden Bookcase door will be deeper than your typical door (duh), as such your casing will need to be wider than what is likely installed. The other main difference is that you do not want to use casing that has drill and carve outs for latches and hinges, we will be using a secret hinge that sits on the top and bottom of the door (not the side).
You want the casing to be flat stock wood.
For this project, we used a 4″ flat casing . As a ex-home depot employee I hate to say that I had to go to Lowes to get 4″. Alternatively, you can make your own casing. We elected to go pre-packaged to cut down on total build time.
You may need to cut the casing to fit your doorframe, you want the fit to be snug long ways, I had to tap mine in with a hammer to fit it. Width will have gaps that you will shim.
Step 1 – Plumb
Plumb is when both sides of the jamb have true vertical alignment.
Vertical Alignment- Place a 6′ level along one side of the jamb (the side that is facing the other jamb) and make sure that the bubble is centered. I check as many areas as space allows. Repeat this on the other side.
Vertical Measurement – Place the 6′ level along the outer edge of each jamb (the side that is facing the room) and make sure that the bubble is level. This is four total measurements, two on each side of the opening.
Check Head Jam level – Hold 2′ level flat against the top jam (the side facing downwards. Check this in multiple places.
Check the Sill (or in my case floor) – My concrete floor was not level and I toyed with a few ways to correct for this. In the end the easiest way to correct this was to match the angle with a door seal that matched the color of the bookcase. If you are working with something other than concrete then do your best to level out the sill.
If things don’t line up, use shims to get things right. I used my nailgun to shoot a few nails into the frame to hold it in place.
Step 2 – Square
Run the a tape measurer from one corner to the opposite corner and take a measurement.
Run the tape measurer a second time from the two other corners.
If the two measurements match, then your door is square.
Once the frame is plumb and square hit the frame with more nails until it is secure.
I can’t emphasize enough that this is a critical step in this process. It is easy to focus on and get excited about the bookcase door itself but without a plumb and square doorframe the rest of the project is doomed.
This is also a great milestone in the project. If you are a DIY’er you know that messy common areas are stressful. The wide casing provides a nice passthrough and is not an eyesore. The majority of the rest of the hidden bookcase door project will be built in your workshop, so your common area can be clean and relatively nice looking while you take on the rest of the project.
Hidden Doorway Bookcase.
Making the Face of the Frame
Now it’s time for things to get interesting
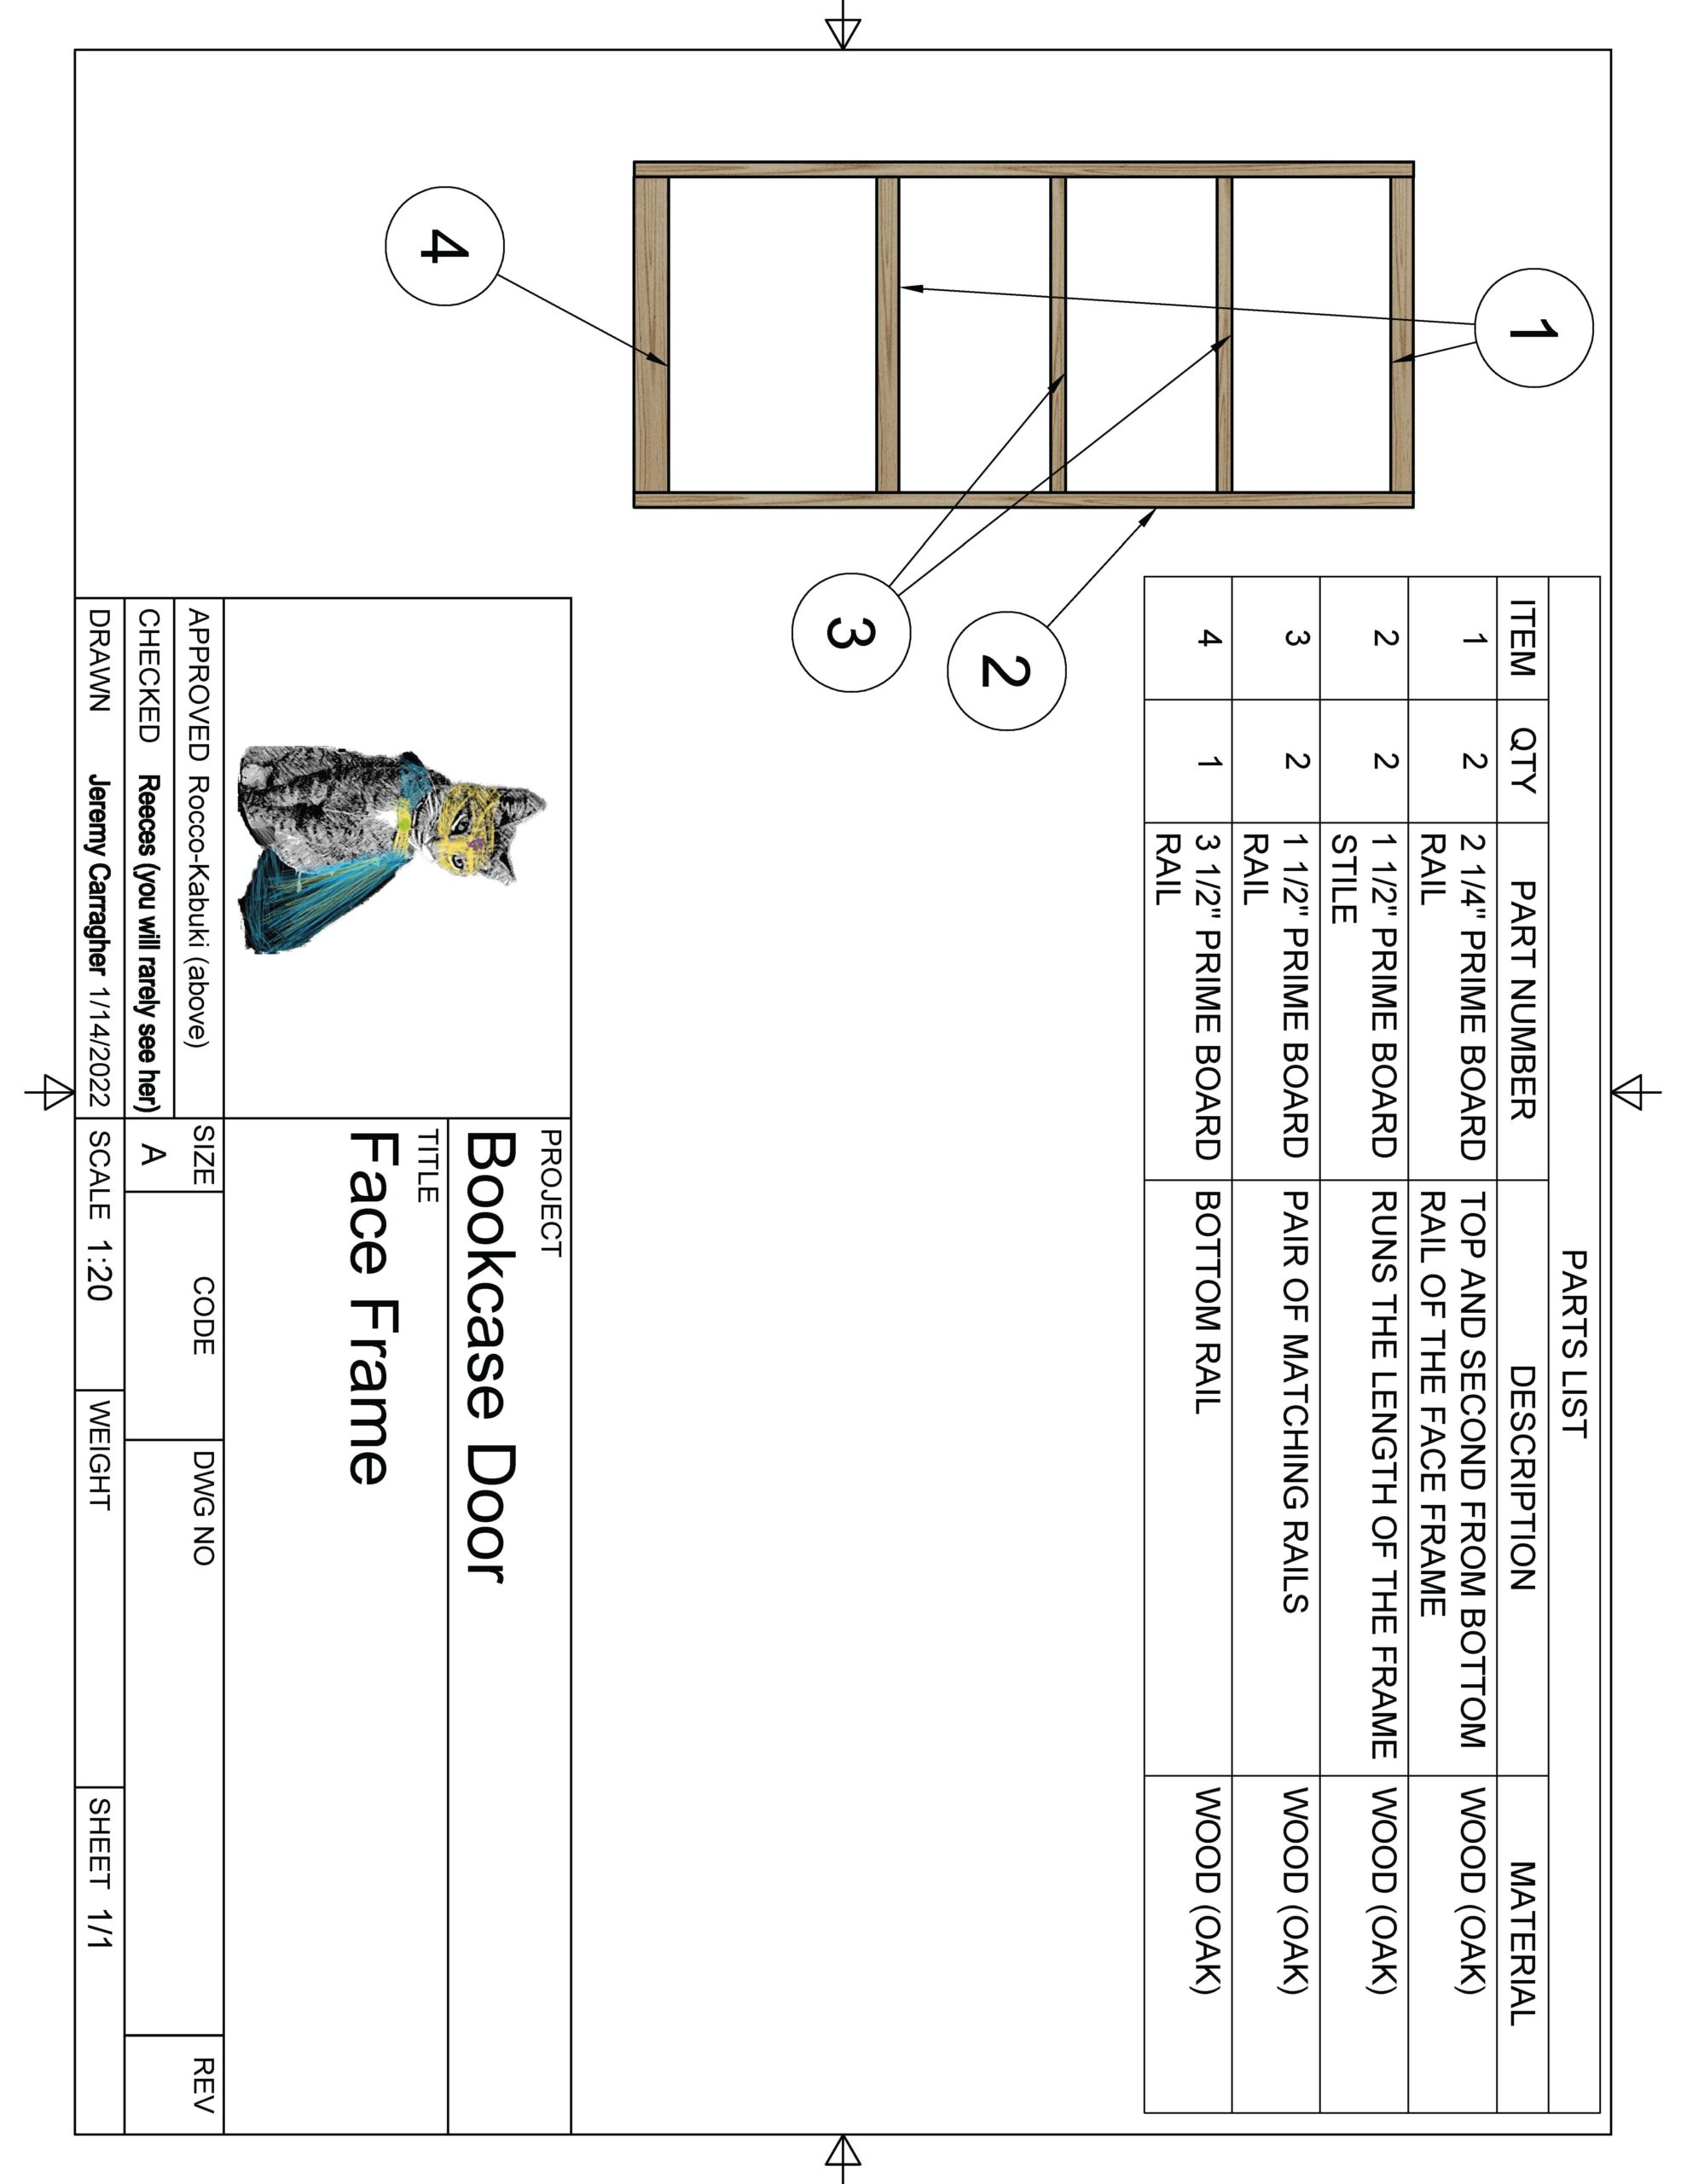
How to make the bookcase frame:
Your bookcase will start to take shape with the face of the frame. This is a challenging project and the frame face is a great way to get acclimated to the process.
The dimensions of your project may vary from what is listed here. It’s important to measure your opening. Subtract 1″ from the width and 1″ – 1 1/8″ from the height. I put a variable on the height because my floor was uneven. I needed to account for the slope in the concrete and so I left a little more room then most may need.
I found it helpful to lay everything out on the table to get a feel for the look.
Start by cutting your two 1 1/2″ stiles to length. Place them next to each other and mark 2 1/4″ from the top and 3 1/2″ from the bottom. These are the markings for your rails.
There is room to customize here, the rail thickness is really up to you and how you want the bookcase to look. This is also the step where you need to determine the number of shelves that you want on the hidden bookcase door. I suggest laying out various configurations to find what you like best.
I decided on four (4) total shelves. I liked the idea of a thicker bottom rail. Keep in mind that molding will cover a good portion of the stiles, leaving 3/4″ showing on the stiles.
Your placement of the shelves is also up to you. Again, I recommend playing with different layouts to find something that works for you.
I wanted a wide opening at the bottom and then some even shelves above that.
Your working “open” space is the total length of your stiles less the thickness of your top and bottom rail. In my case, this was 72 3/4″.
The length of your rails is the total width of your frame (the width of the opening less one inch) minus the width of the stiles (1 1/2*2).
If the width of your door opening is 35 and your two (2) stiles are 1 1/2″ wide each then the length of your rails is 35″ – 3″ = 32″. My cut list shows that I chose to make my rails 1/4″ shorter than that (31 3/4″). I wanted to make sure that I had plenty of clearance when opening and closing the door. Your molding will cover the gap and so it is up to you if you want to put an extra 1/4″ clearance or not.
Once you’re happy with the layout, drill two pocket holes on the ends of the rails. Work slow and use your T-square to make sure that you are straight.
If this is your first time drilling pocket holes then I suggest practicing on scrap wood.
Once your holes are drilled, put a bead of glue on each end and secure the rails to the stiles.
You now have your frame, great job!
What is a Door Stile?
If this is your first carpentry job you may not be familiar with some of these terms, I wasn’t.
A stile is a vertical piece of wood used in the frame of a cabinet. Two stiles are combined with rails to complete the frame.
Hidden Doorway Bookcase.
Building the Case
It’s time for the case, the bookcase. No, this part is actually just called the case. It is what we will attach the frame to (then we can call it a bookcase.
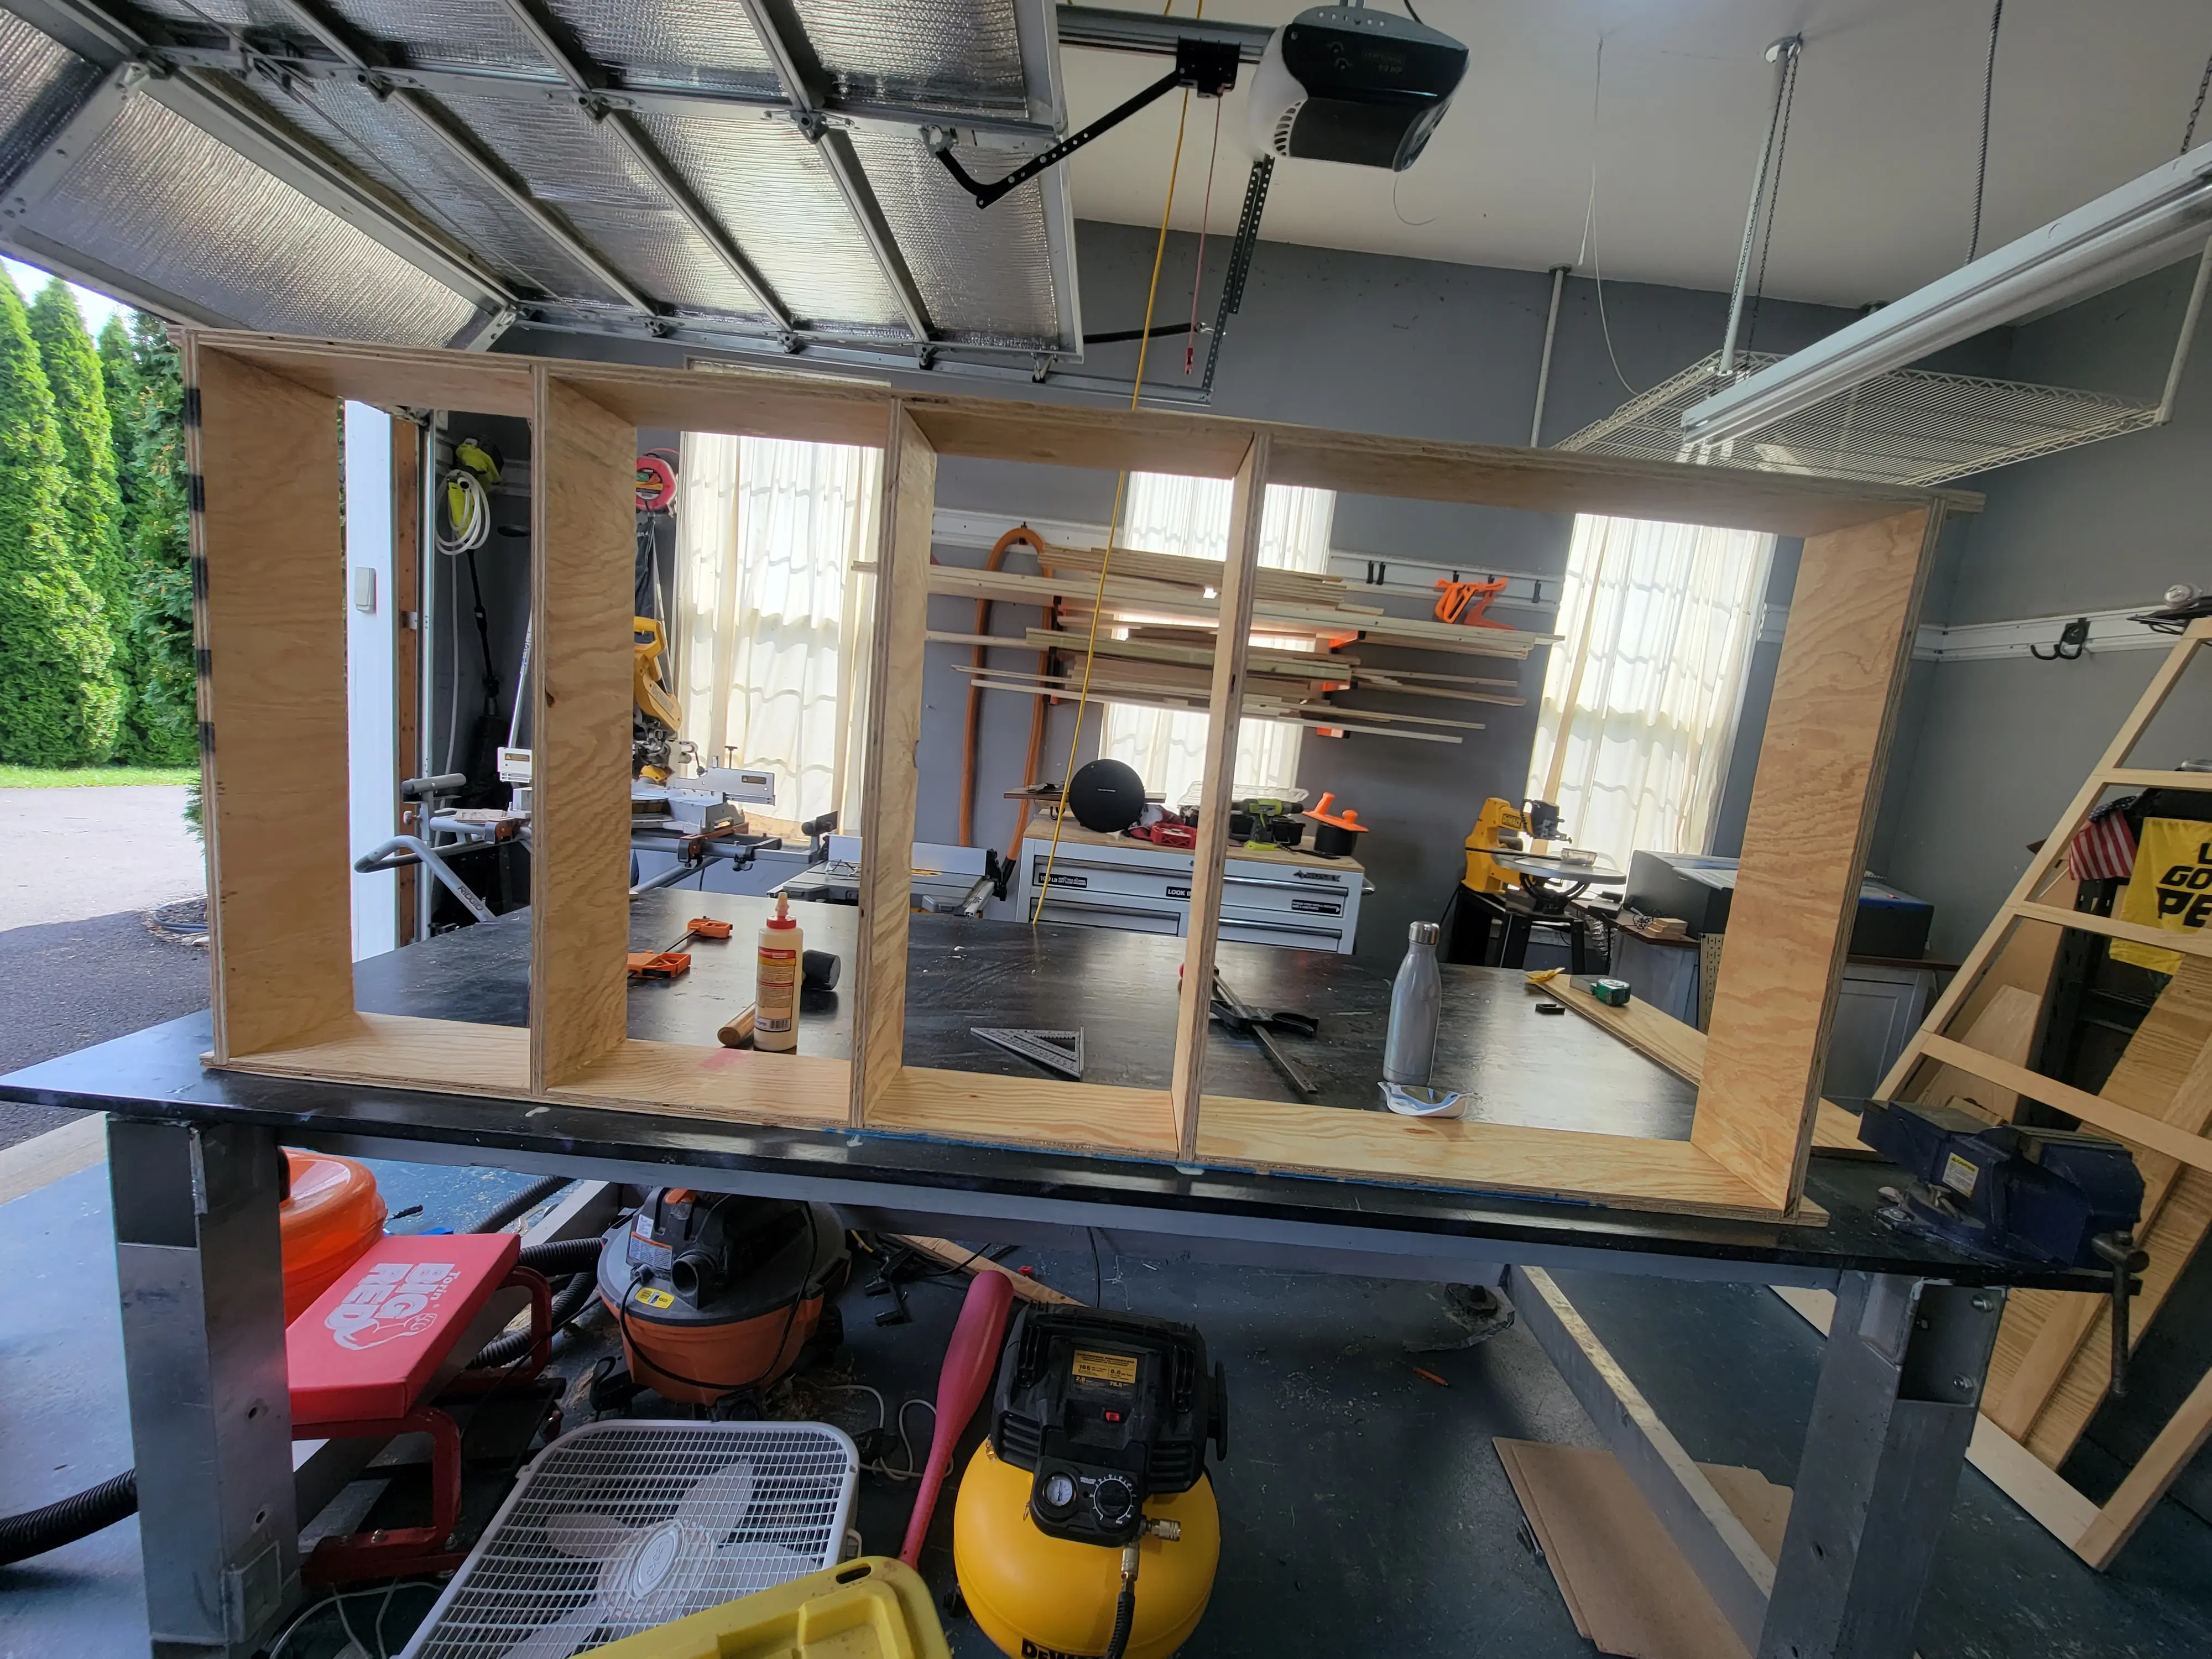
The total depth of the hidden bookcase door should not exceed 8″, this avoids the chance that the case hits the doorway when opening and closing.
We need to determine the width of the sides of the bookcase as well as the width of the shelves.
To start, our shelves and sides will be cut from 3/4″ plywood. This gives a nice sturdy feel. The back of the case will be 1/4″ plywood as 3/4″ would be overkill.
Note: Pictures for reference are below this step.
How to build the bookcase door bookcase
Width of the sides of the bookcase & shelves: We are using 1/4″ plywood for the back and the thickness of the rails (face frame) is 3/4″ thick. This gives us 1″ inch of thickness. If we don’t want to exceed 8″ in total depth then we should subtract 1″ from 8″ leaving the width of the sides equal to 7″.
Width of the sides & shelves: 8″ – 1/4″ – 3/4″ = 7″. ( see pics below
We are building a sturdy bookcase and we want more support than simply drilling/nailing the shelves into the sides – because of this we need to account for dado cuts that are 3/8″ on each side. We will get into this on the next step but for now just trust me that we need to add 3/4″ onto the length of the shelves.
Shelf length: 32 1/2″
Final Dimensions:
- Shelves: 3/4 thickness, 7″ width, 32 1/2″ length
- Sides: 3/4″ thickness, 7″ width, 77 1/2″ length
It doesn’t benefit us to cut the back panel yet. We will save this for a later step.

Side View
This view shows the side panel of the hidden bookcase door sandwiched between the front 3/4″ frame and the rear 1/4″ backing.

Front angle view
Note that the shelves run “into” the face frame. This is why the width of the shelves only need to be 7″.
The shelves will be inserted and supported by dado cuts on the side panels, we will cover that in the next step.

Front(ish)
One more angle to hopefully help paint the picture. I have a full 3D model available for purchase ($6.99), just email thecraftycatsman@gmail.com
Hidden Doorway Bookcase.
Dado Cuts
We will cut, just not all the way.
Dado Cuts are key – they add necessary reinforcement to the shelves. If you never cut a dado cut before don’t worry, neither did I. they are simple enough to do but require a special dado blade. The goal of a dado cut is to notch out wood which then allows another piece of wood to slide into it. With a dado, you do not want to cut through the wood. It is critical that you measure the depth of your cut, we are cutting our dados 3/8″ deep.
How to make Dado cuts
If this is your first go at dados make sure to check the capacity of your table saw. We are cutting 10 total (5 on each side) 3/4″ wide dados. I bought a set that had a 3/4″ cutting capacity but my saw didn’t have enough space to fit the number of blades required to cut 3/4″ dados.
If you run into this situation it’s no big deal – fit the number of dado blades that you can and measure carefully. I could only fit 1/4″ dados and so my solutions was as follows:
Measure the location of the 3/4″ cuts by placing the two sides next to one another. Mark the 10 spots with a pencil and triple check that everything lines up. At this point I did a lot of piece placement. I laid the pieces out on my workbench and lined everything up best that I could to make sure that my measurements were accurate. It’s well worth the time and I highly recommend it. If you mis-align the dado cuts it will be very difficult if not impossible to fix the error.
If your table saw does not have the capacity to hold 3/4″ Dados then I recommend the following:
Once you have your 3/4″ markings, cut each side of the measurement and then run the blade back and forth to chip out the middle of each.
If your table saw has the capacity to cut 3/4″ Dados then you will sweat significantly less than I did during this step. Line up your cuts and chip away.
You want the fit to be tight and if you did this correctly you likely need a mallet to hammer the shelves into the newly made slots. In my project, I had some that were tight and some that were loose. I fixed the loose ones with wood filler and glue (you will nail these in place anyway but the tighter the better).
Hidden Doorway Bookcase.
Assembling the Bookcase
Note, I didn’t say “Secret” – we ain’t there yet homey
At the end of this step you will have made a bookcase (we will turn it into a door later), could this be the beginning of a flourishing career in carpentry? Hide your work from significant others and family or you may have a long list of holiday gifts to make!
This part is relatively easy, especially in comparison to the prior steps. It’s also rewarding to see your meticulous (you were meticulous, right?) planning take shape.
How to build (put together) the bookcase for the bookcase door
In this step, we will attach the shelves to the sides of the bookcase. First, we will dry fit everything. This involves pushing the shelves into the dado cuts then laying the face frame on top of the case. You want to make sure that neither the sides nor the shelves are sticking out, if they are and it can’t be corrected then you will have to sand things down to make them flush.
If everything looks good then put a bead of glue in every dado cut. Use a mallet to hammer the shelves into the dado cuts and then tack nails through the sides of the bookcase into the shelves. The cabinet should now look like a wide ladder.
With the cabinet laying flat put a bead of glue on all surface areas that point upward (where the frame will rest). This helps the frame stay in place when drilling pocket holes.
Lay the face frame on to the casing and ensure that everything lines up and is square. ] Once you confirm this, secure the frame with as many clamps as possible. I only had three but it did the job.
Tack a few 16 gauge nails into the face frame to hold it in place.
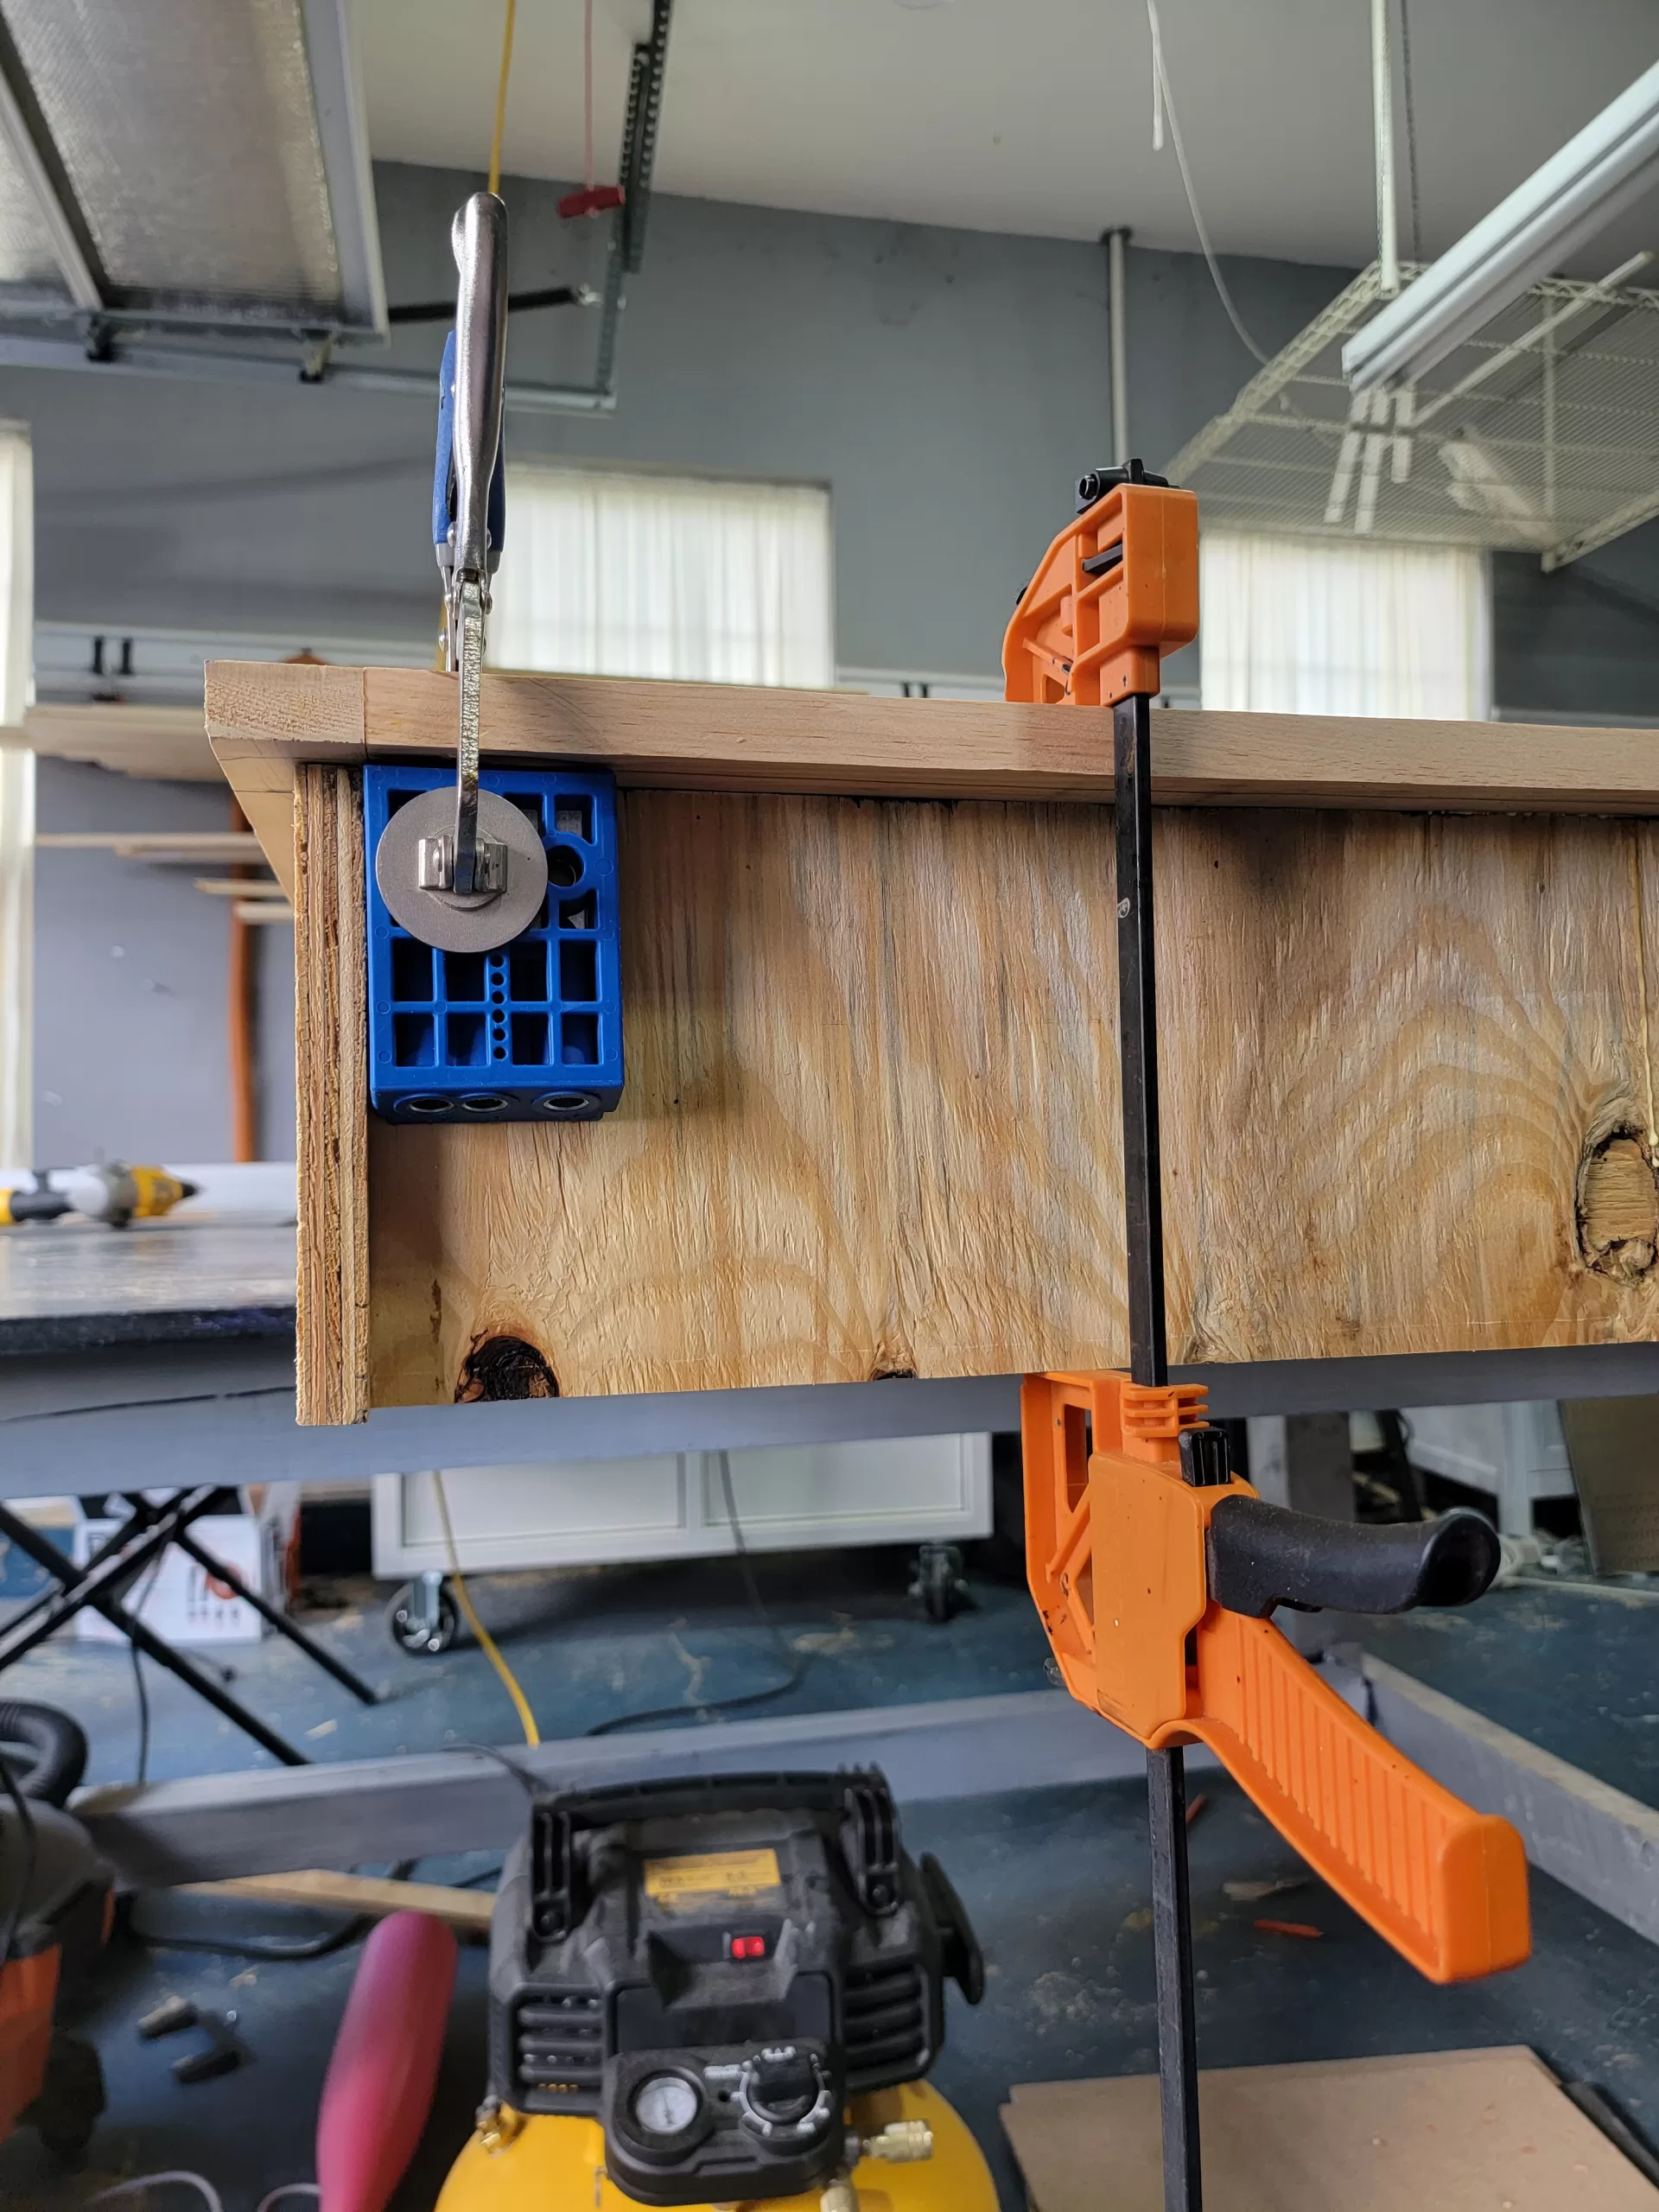
Now that the frame is in place we can start to drill the pocket holes through the casing into the face frame.
If you are like me and have a limited number of clamps then work down the side of the case moving the furthest clamp ahead of you. For example, in the picture above, I moved the clamp on the right to the other side of my pocket hole jig then drilled. you want the frame to be as tight as possible when drilling. Once that hole was made I moved the red clamp a bit further down the line, I repeated that process around the case.
I drilled pocket holes every 12-16″, once all the holes were drilled I went back and screwed everything together. I like putting a bit of wood glue in the hole before screwing – a little extra support never hurt anyone.
Now that the face frame is secured to the case it’s time to tack the back panel on. For this step, I put a piece of 1/4″ plywood against the casing and then I marked the outline with a pencil. This gives you nice clean lines. Attach the back panel with wood glue and finish nails.
Optional: I decided to use wood filler to cover up larger imperfections on the plywood. I did this obsessively starting at this step and many times after but wood filler is completely optional. If you want to do this, take a putty knife and run wood filler over and imperfections that you have.
Tip: For smaller holes, I took my finger and rubbed the filler in. This minimized the amount of material needed and reduced the sanding time.
Clean up any drips and then let the wood glue and filler dry overnight. After things dry check your bookcase for any glue runs, clean them up and sand the wood filler. Wipe the surface areas down with a lint free rag.
It’s at this point that I put my first and second coat of white paint on to the hidden bookcase door. I put an additional coat on at the end of the project
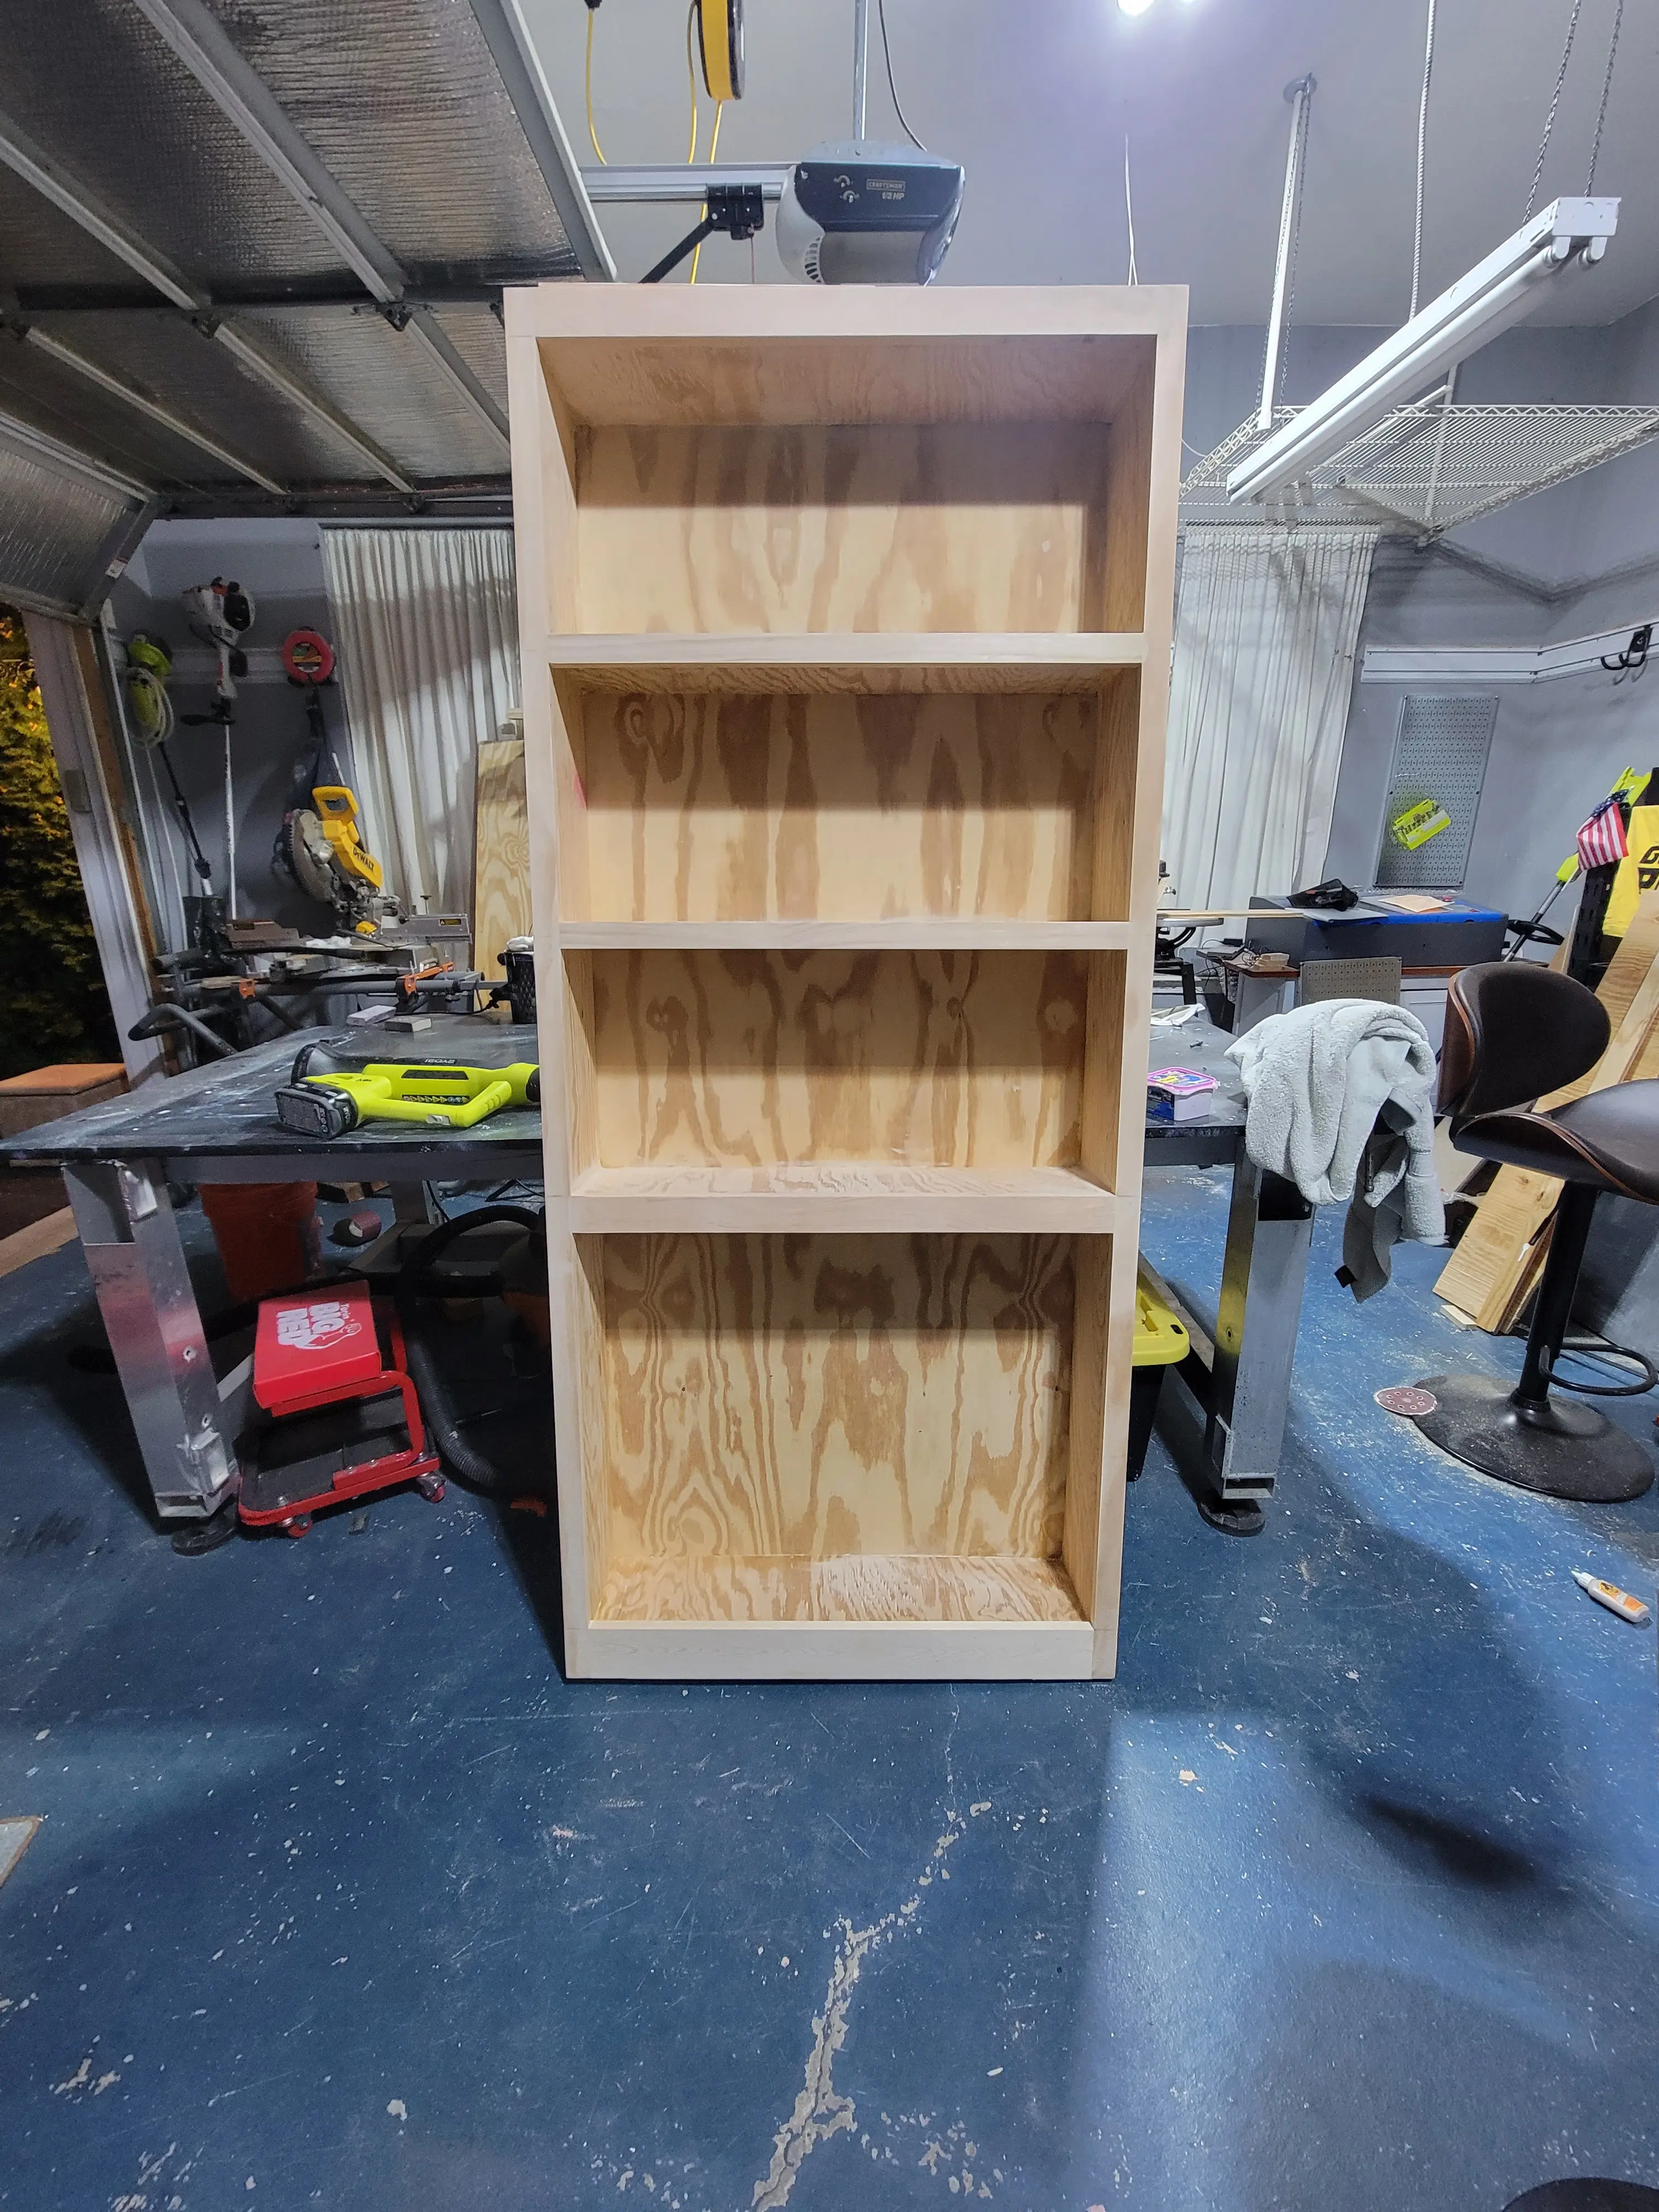
Bookcase before paint
Taking Shape

Checking the fit
A milestone in the project – congratulations!

Two coats of paint
I put a third coat on at the end of the project.
Hidden Doorway Bookcase.
Hidden Door Hinges
Tambee secret door hinges for the win
Top Hinge
This is a view from the back (video 2)
Bottom Hinge
This is a view from the front (video 3)
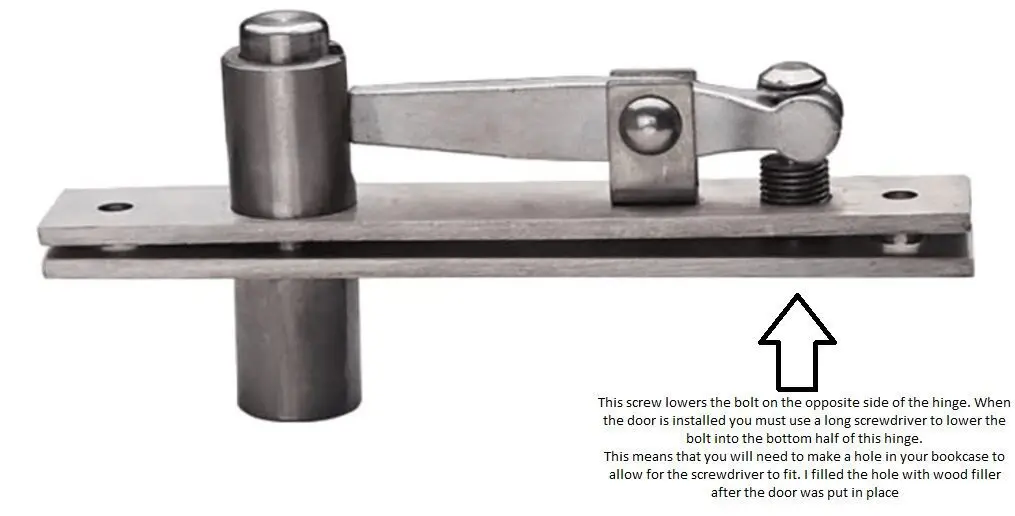
Hidden Bookcase Door - Hinge instructions
Hinges
Sweet caterpillar its time to become a butterfly. . .i.e,. your bookcase is about to blossom into a lovely hidden bookcase door.The magic is in the hinges. While there are a number of hinges on the market, I found the Tambee Door Pivot Hinges to be the best: https://amzn.to/3s8wfRQ.
In fact, I spoke with the manufacturer and was able to get you 6% off of the price. I know it is not much but every little bit helps. Use code 06CraftyCman at checkout to get the discount.
The key is to set the hinges far enough away from the side to allow for smooth opening and closing, you also will need line the top and bottom hinges up with your plum bob. To do this, I cut a piece of scrap wood to match the dimensions of the bottom of the bookcase. I then placed my bottom hinge on the ground and had the scrap wood open and close on the hinge, mimicking the path of the bookcase. Your top hinge and bottom hinge must be perfectly aligned. To do this, you get to use arguably the coolest named tool in the box, the plumb bob. This simple tool has been used since the Babylonians and I think I paid $5 for one a harbor freight.
Make sure that your door will safely open and close where your bottom hinge is. Then hang the plumb bob from the top of the door and get it where the point of the plumb of the plumb bob is pointing directly on the cylinder of the bottom hinge. Mark where this point is on the top of the door frame. This is where you want the top hinges cylinder to go.
In short, you want the top hinge cylinder to line up perfectly with the bottom hinge cylinder. Once you are absolutely certain of this, proceed to the below:
Top Hinge:
You will need to cut space in your door trim for the top hinge, the video “top hinge” above illustrates this. The hole doesn’t necessary have to be clean but you do need to make sure that (1) there is enough room for the mechanism to move up and down and (2) don’t cut the hole too wide, you need to be able to screw your screws onto the door trim.
To do this, I marked the outline of the part of the hinge that needed to be recessed (see the above video for reference). I used my drill and spade bit to cut a few holes in the middle of the outline and then I cleaned things up with a chisel.
Attach the other half of this bracket to the top of the bookcase. I used a few pieces of scrap wood to line the bracket up. You want the fit to be snug but leave enough room for the brackets to move.
You are going to need to poke the thinnest longest screwdriver that you have through the top of the bookcase to lower the mechanism that locks the bookcase in place. Because of this, you need to mark and drill a hole through the hinge hole that allows access to the screw on the top portion of the hinge. This goes all the way through the top of your bookcase and will allow you to poke a screwdriver through it in a later step. See the above pic for reference.
Bottom Hinge:
I built my bookcase door for a basement and because of this I need to deviate from the hinge instructions. To account for concrete I flipped the bottom bracket over. This allowed me to cut the notch out of the scrap wood that holds it (as opposed to the concrete). The downside of this was that I needed to balance the little ball bearing when putting the door on, by myself, 50 times, uphill both ways in the snow.
If you are not dealing with concrete then you can install the bottom bracket as the instructions dictate. In this path you would notch out enough for the bracket to sit in, then you can put the ball bearing inside the hole which is much simpler.
Important: Make sure that the ball bearing is in the hinge. Without it the door will not open/close smoothly. This is what makes mounting the hinge upside down so difficult. The door kept nudging the ball off the cylinder and I would have to start all over again. Secure the other part of the bracket to the bookcase. Like the top Hinge, I used a few pieces of scrap wood to line everything up. See the video above for reference.
Locking it in:
At this point your bottom hinge should secure but the top of your bookcase will not be. This is when you line your top hinge pieces up and then poke your thin little screwdriver through the little hole that you made in the bookcase. Turn the screw until the cylinder from the mechanism drops down into the bottom half of the upper bracket. Use the above picture for reference.
My opening was extremely narrow and this made the screw stick out too far. To resolve this, I partially turned the screw before lining the hinge up. I then use a butter knife to force the cylinder up far enough to wedge the hinges together. I did this with the bookcase on the bottom hinge and the door open far enough to allow me to see the top hinge. I did this by myself but it would be a lot easier if you had help. It’s tricky and may take some time but it isn’t too hard. Just make sure to have something sturdy to stand on. At first I was using a paint bucket and I almost ate it a few times. A chair did much better, you want to be able to see the top hinge while you line things up.
Your door should now be secure and able to open and close. AWESOME.
If you door pops off the hinge when opening/closing then you have too much space between the top hinges two pieces. You either have to turn the top hinge screw more or narrow the space between the top hinges two pieces.
NOTES: 3D Modeling
It’s a good time to mention that I spent almost as much time building a working 3D model in fusion 360 as I did building the actual bookcase.
This model is to scale and it shows the hinges as well as every nuanced piece of my project. It is also the model that I used to provide measurements in prior steps.
Fusion 360 is free to download and I will supply a copy of my model, along with the prints above for $5.99.
Outswing Hidden Door Bookcase – AutoDesk rendering
Outswing Hidden Door Bookcase Bottom Hinge – AutoDesk rendering
Hidden Doorway Bookcase.
Secret Door Book Latch, Light and Mechanism.
A secret door book latch that illuminates when someone tells google the Konami code
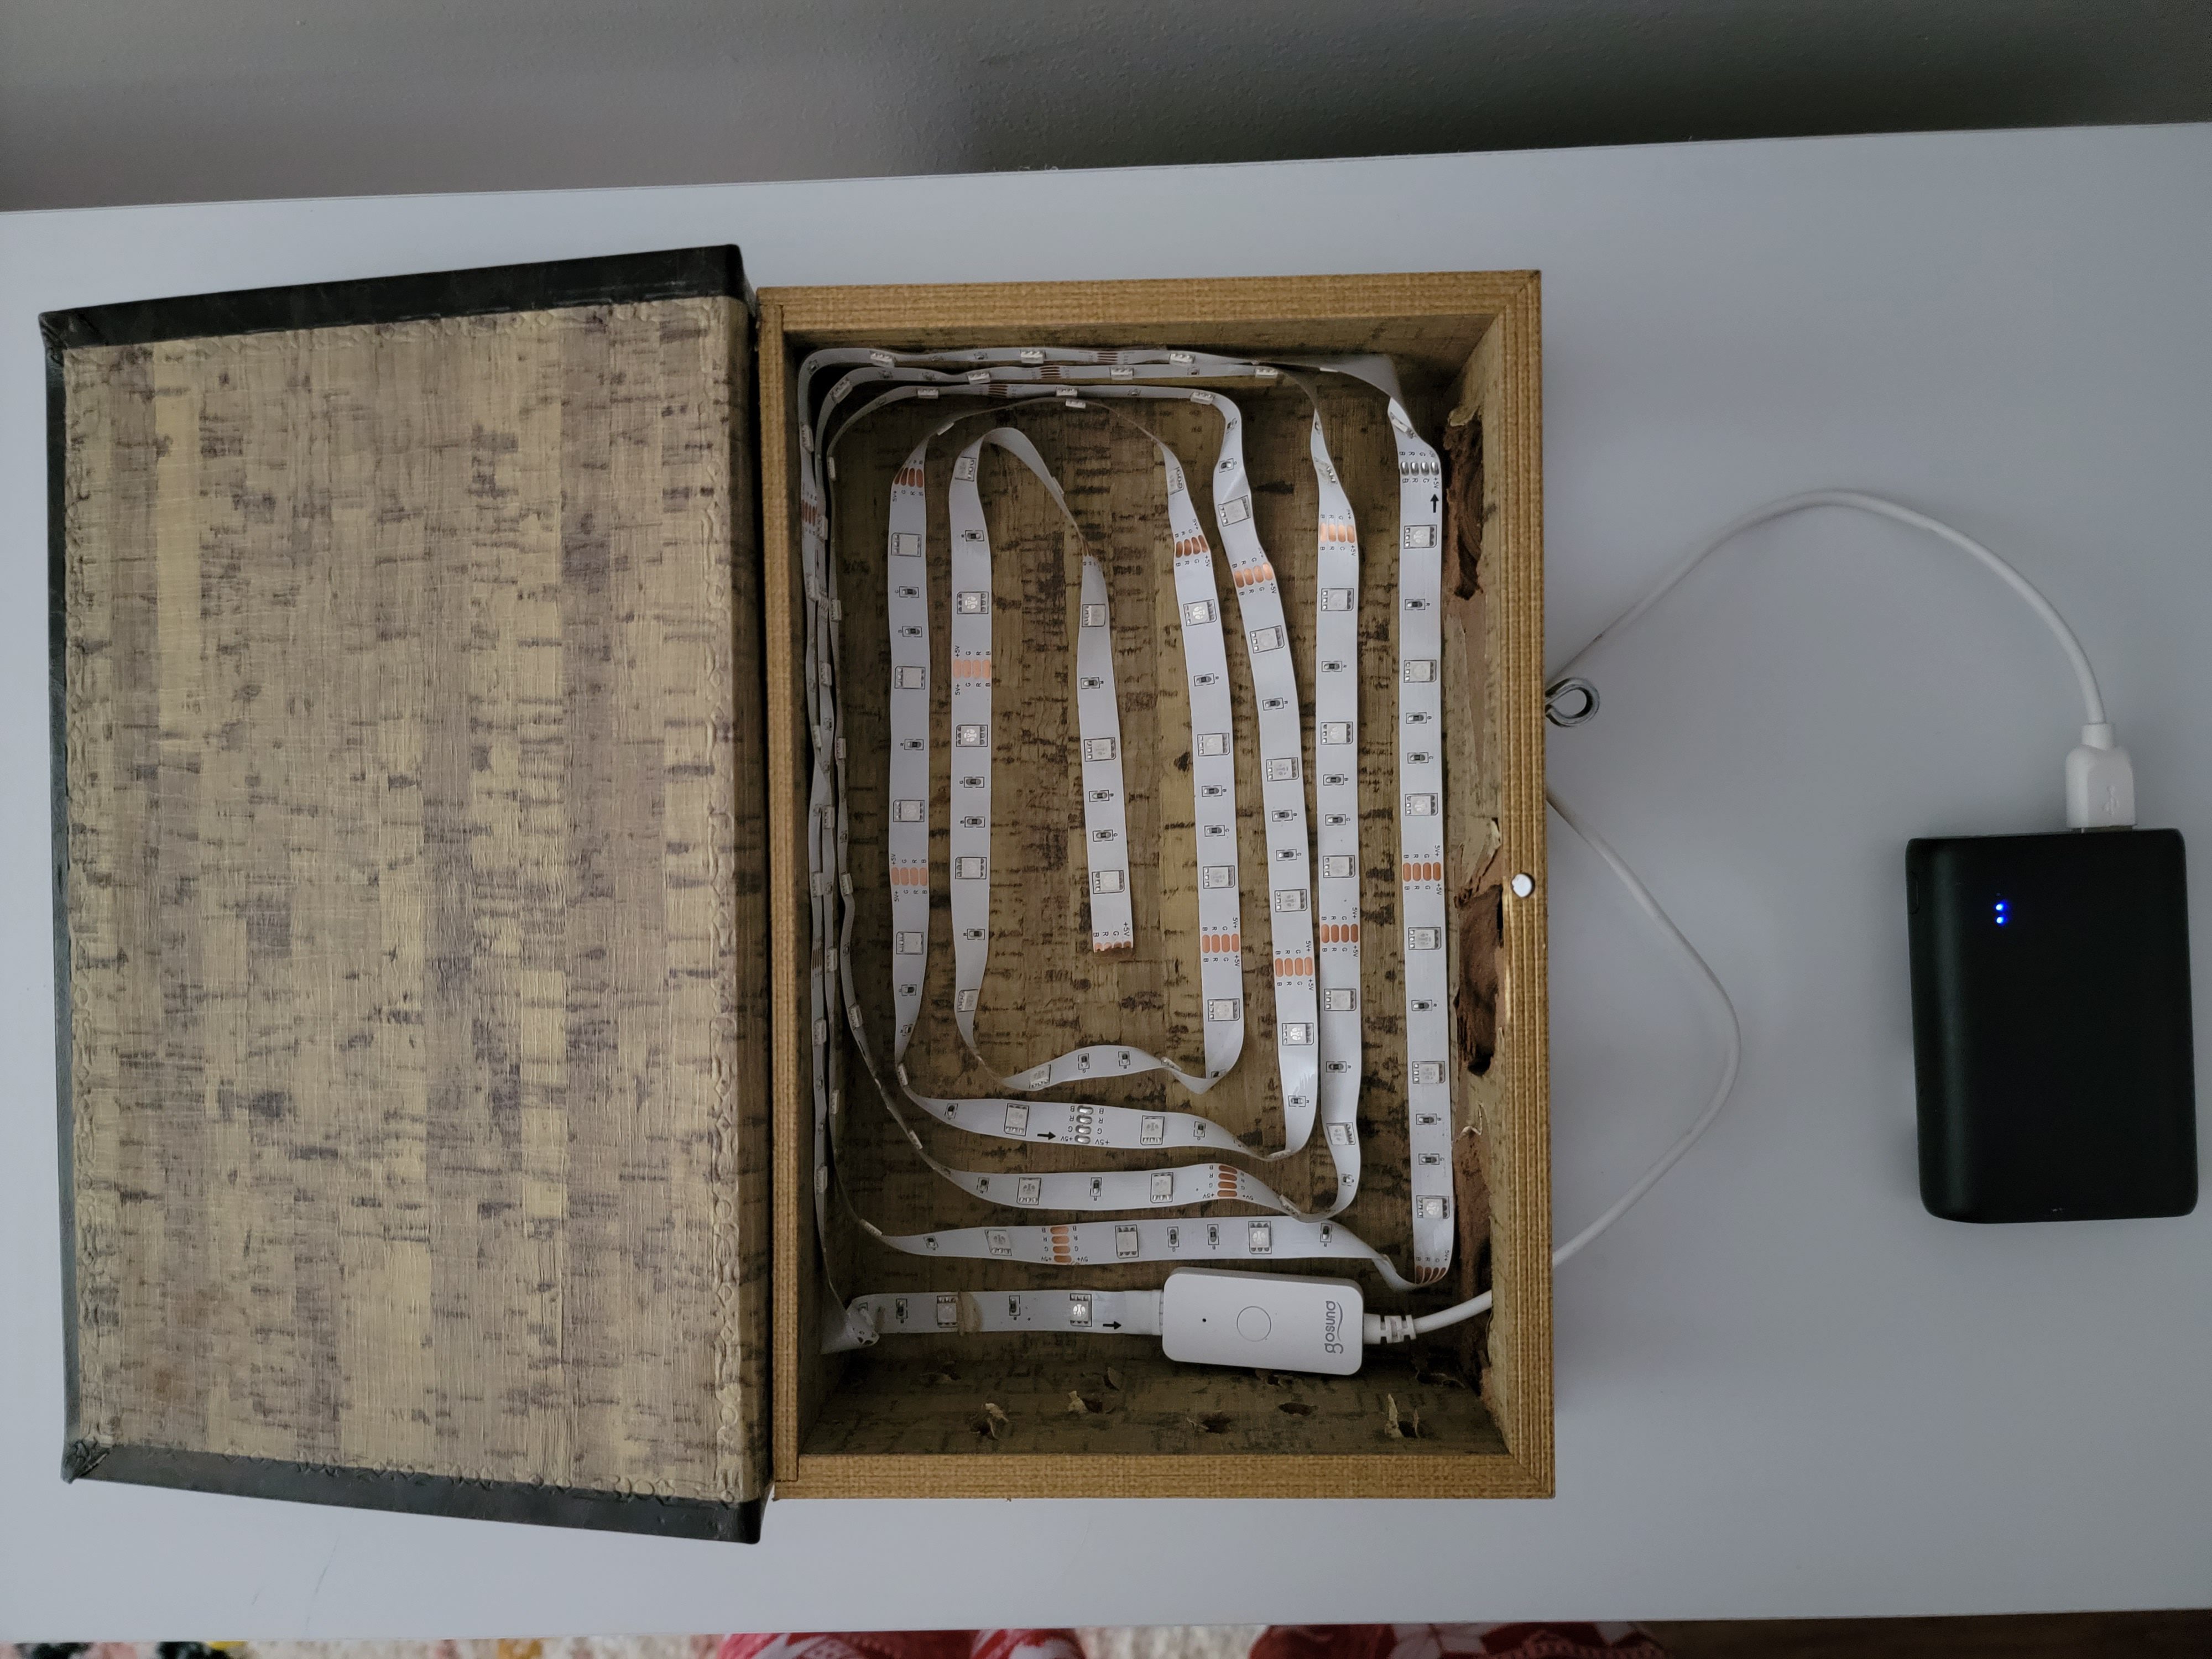
I set a scene on google to turn the book light on when someone says the Konami code. Setting Scenes in google home is extremely easy. I will provide a writeup on this soon.
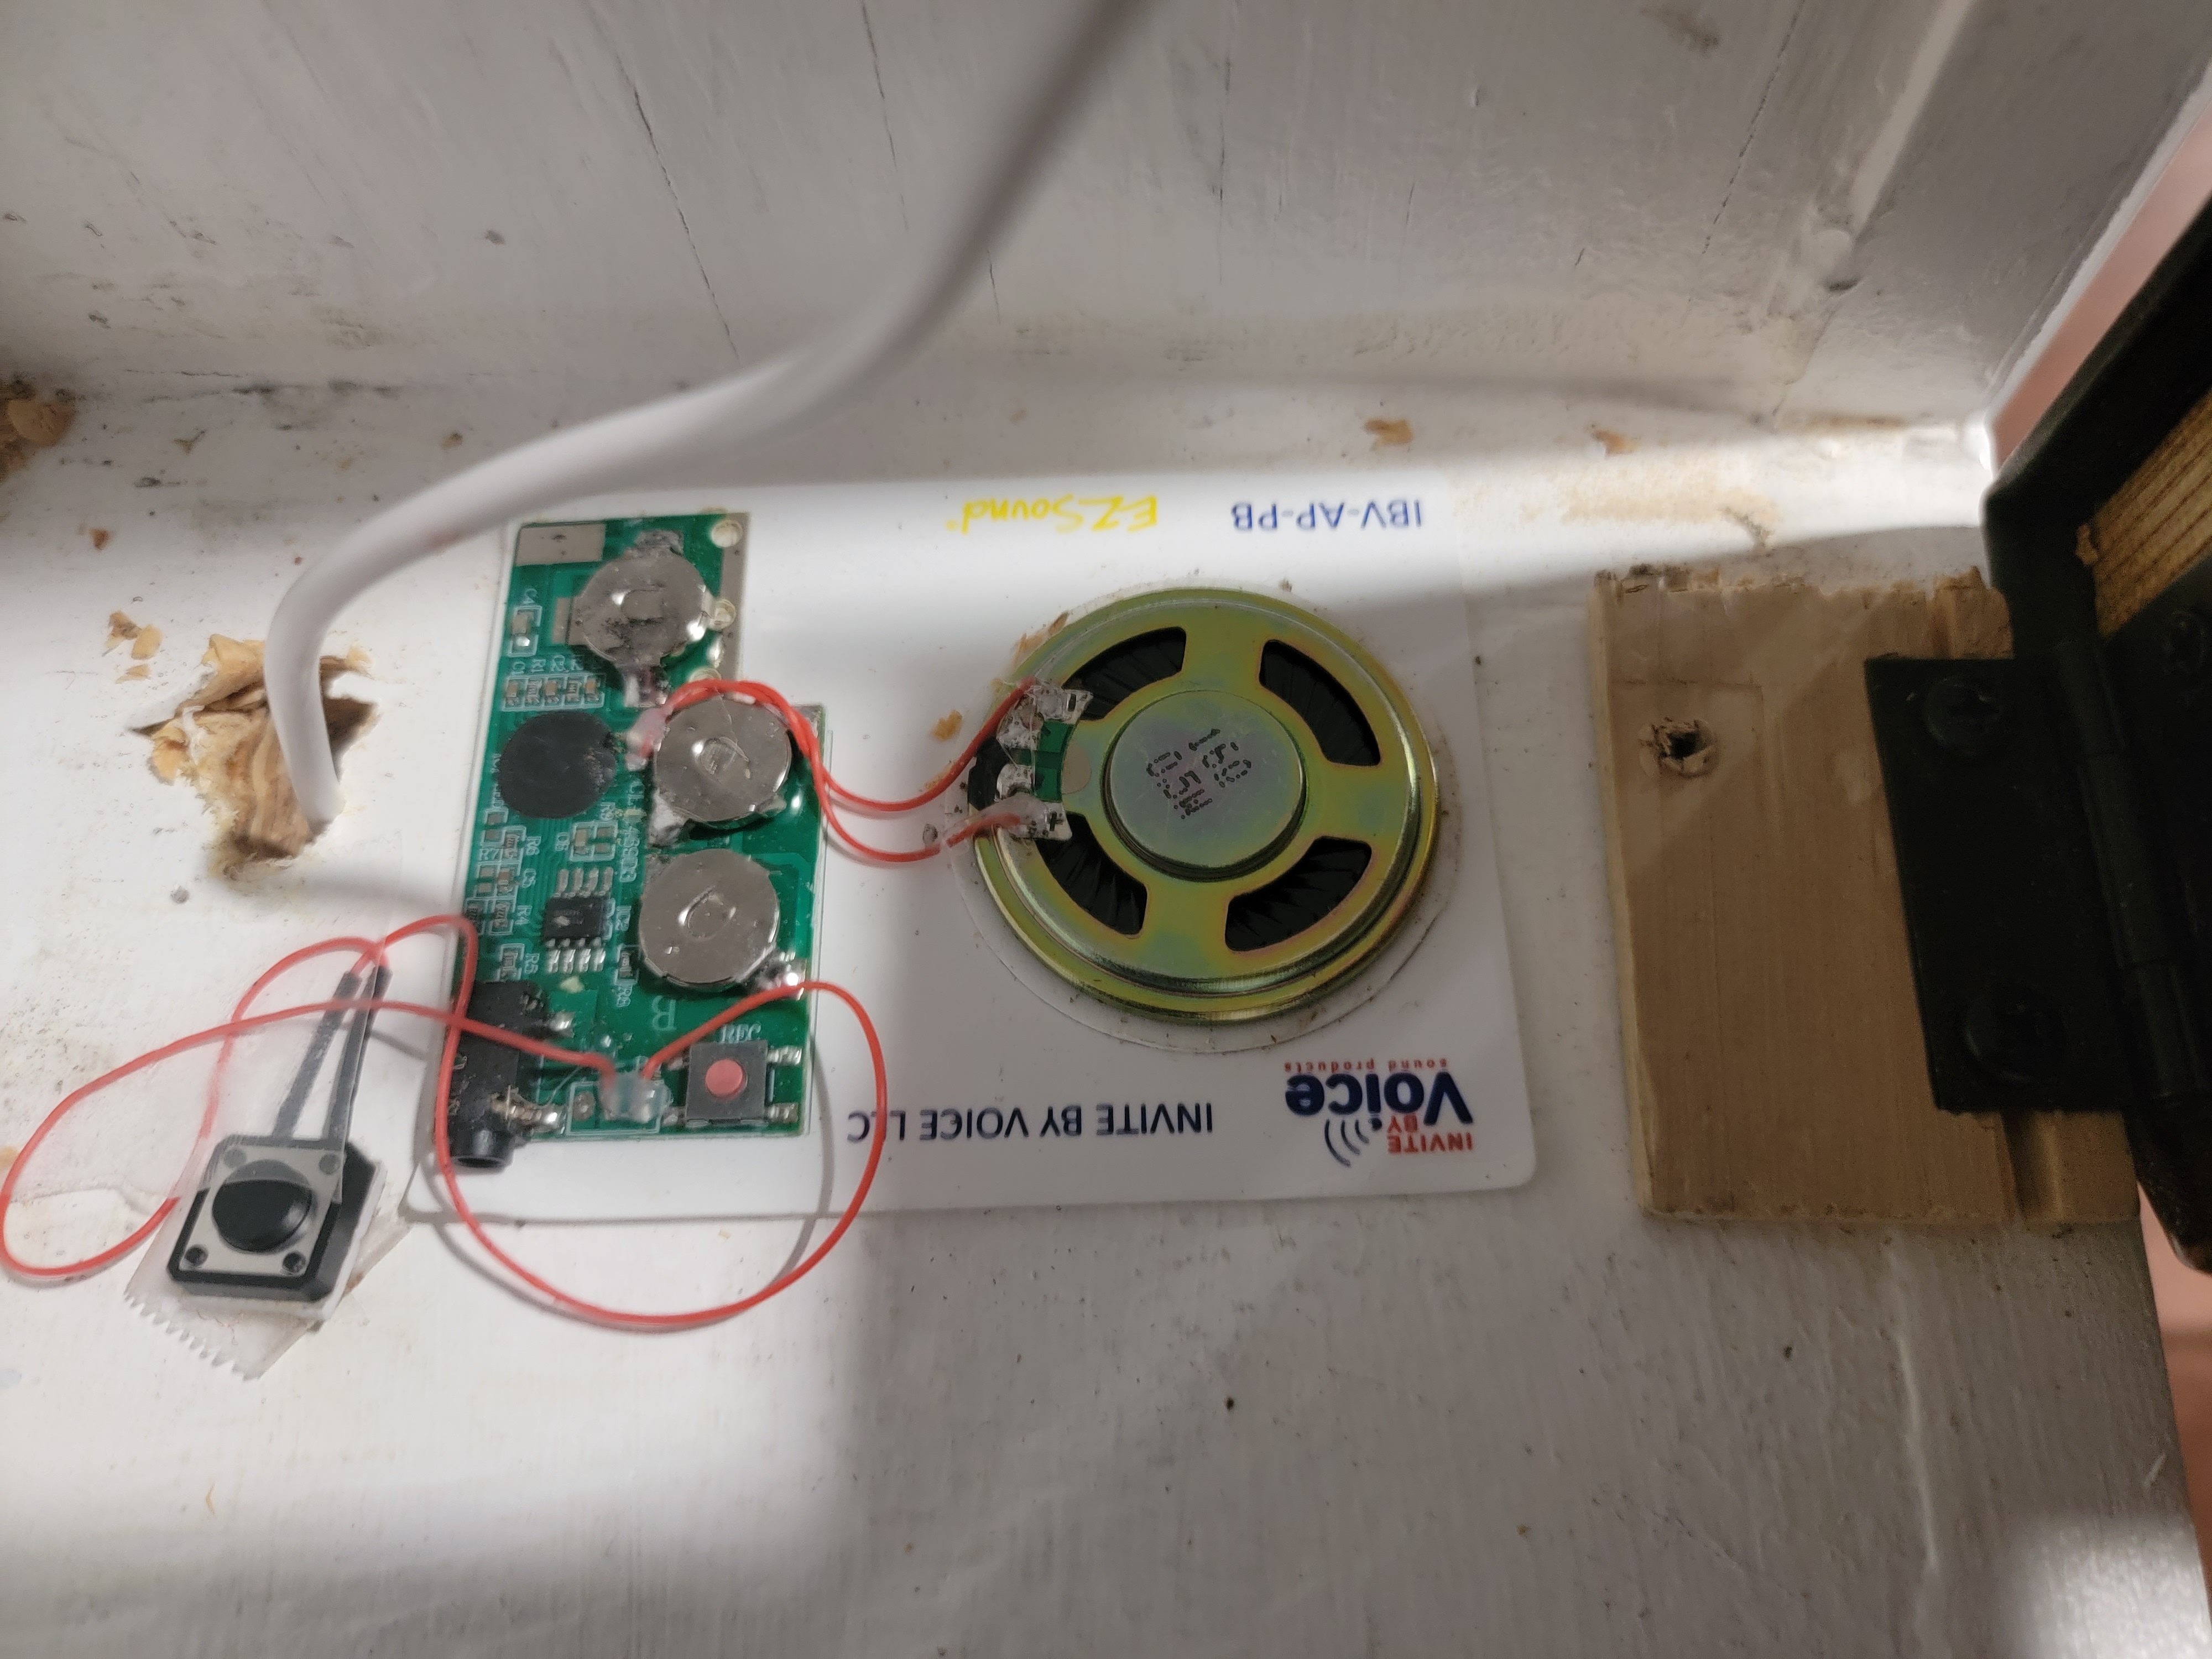
Note, the small hole is where the usb cord runs through the shelf. I built a very small bracket to hold the Portable charger. This is out of sight due to the thickness of the face frame.
You can also see the hinge screwed into the bookshelf (with a small piece of scrap wood wedged in between).
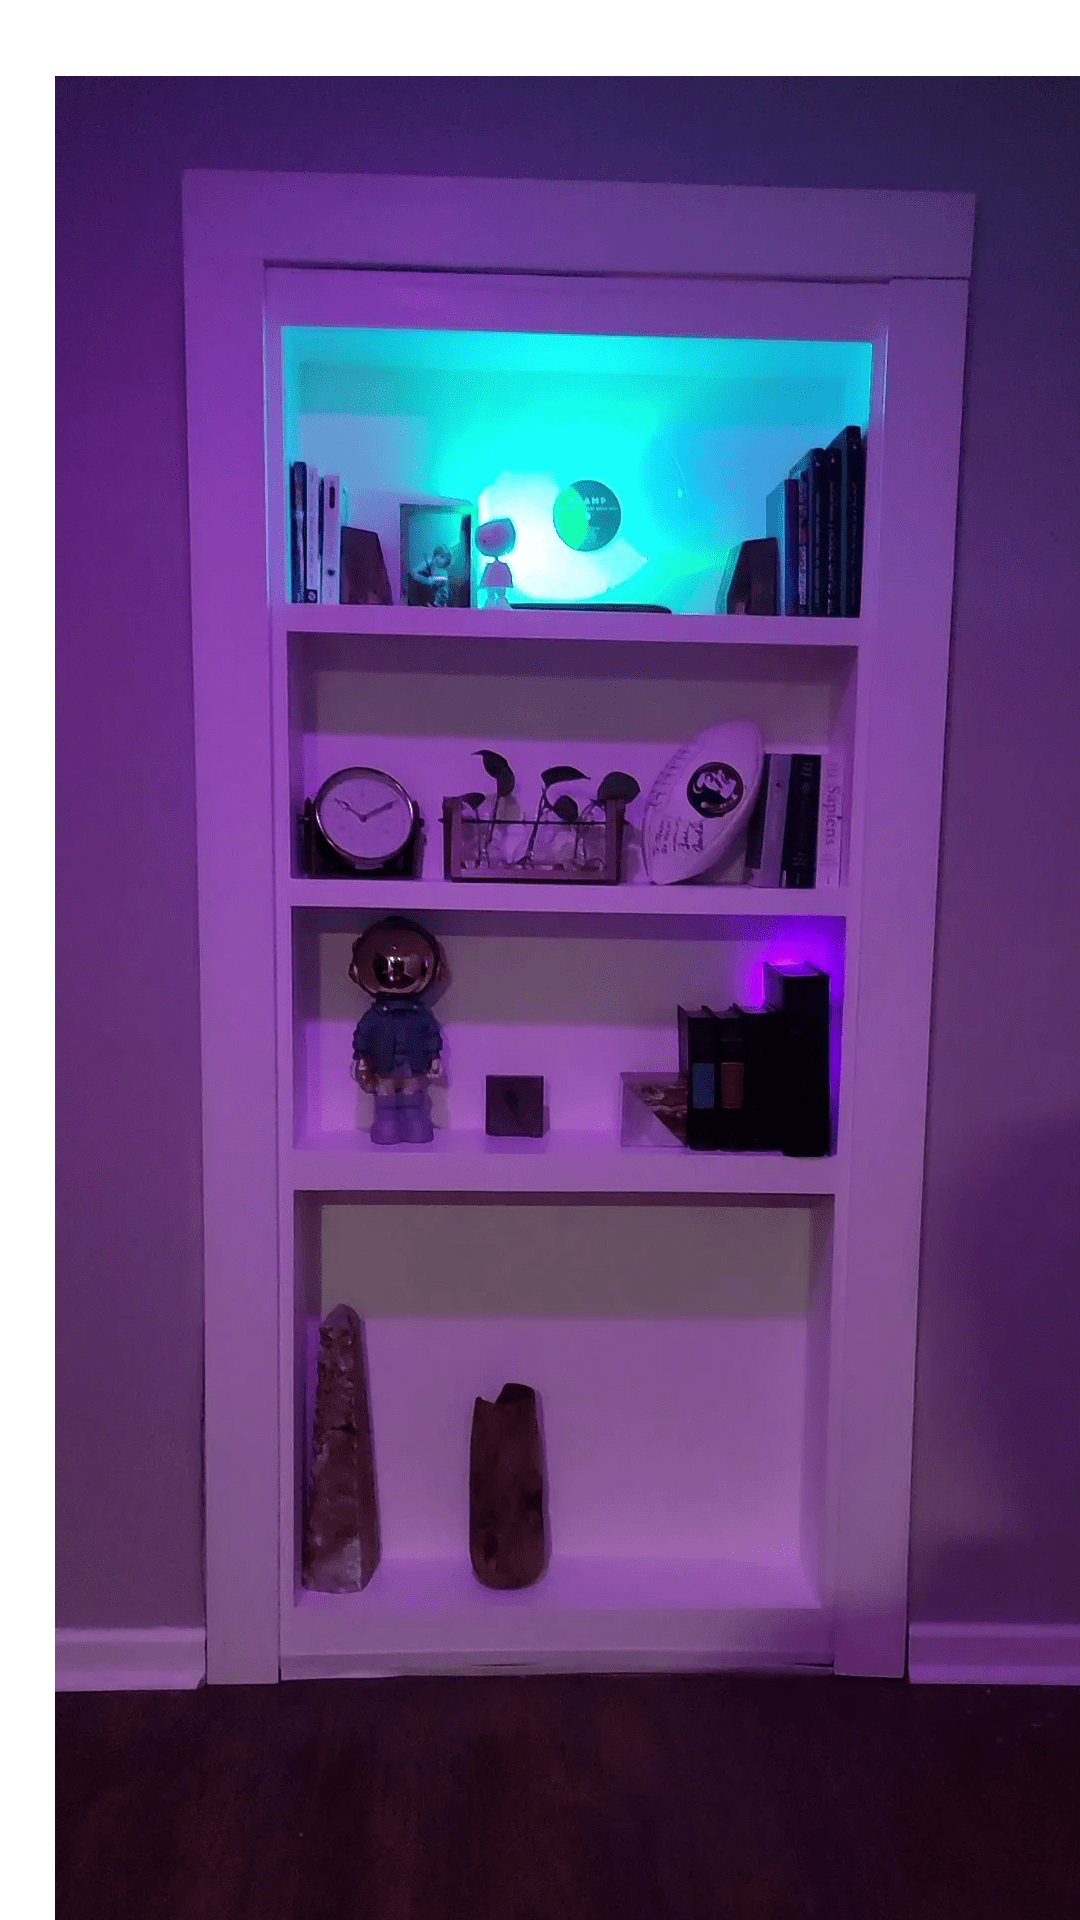
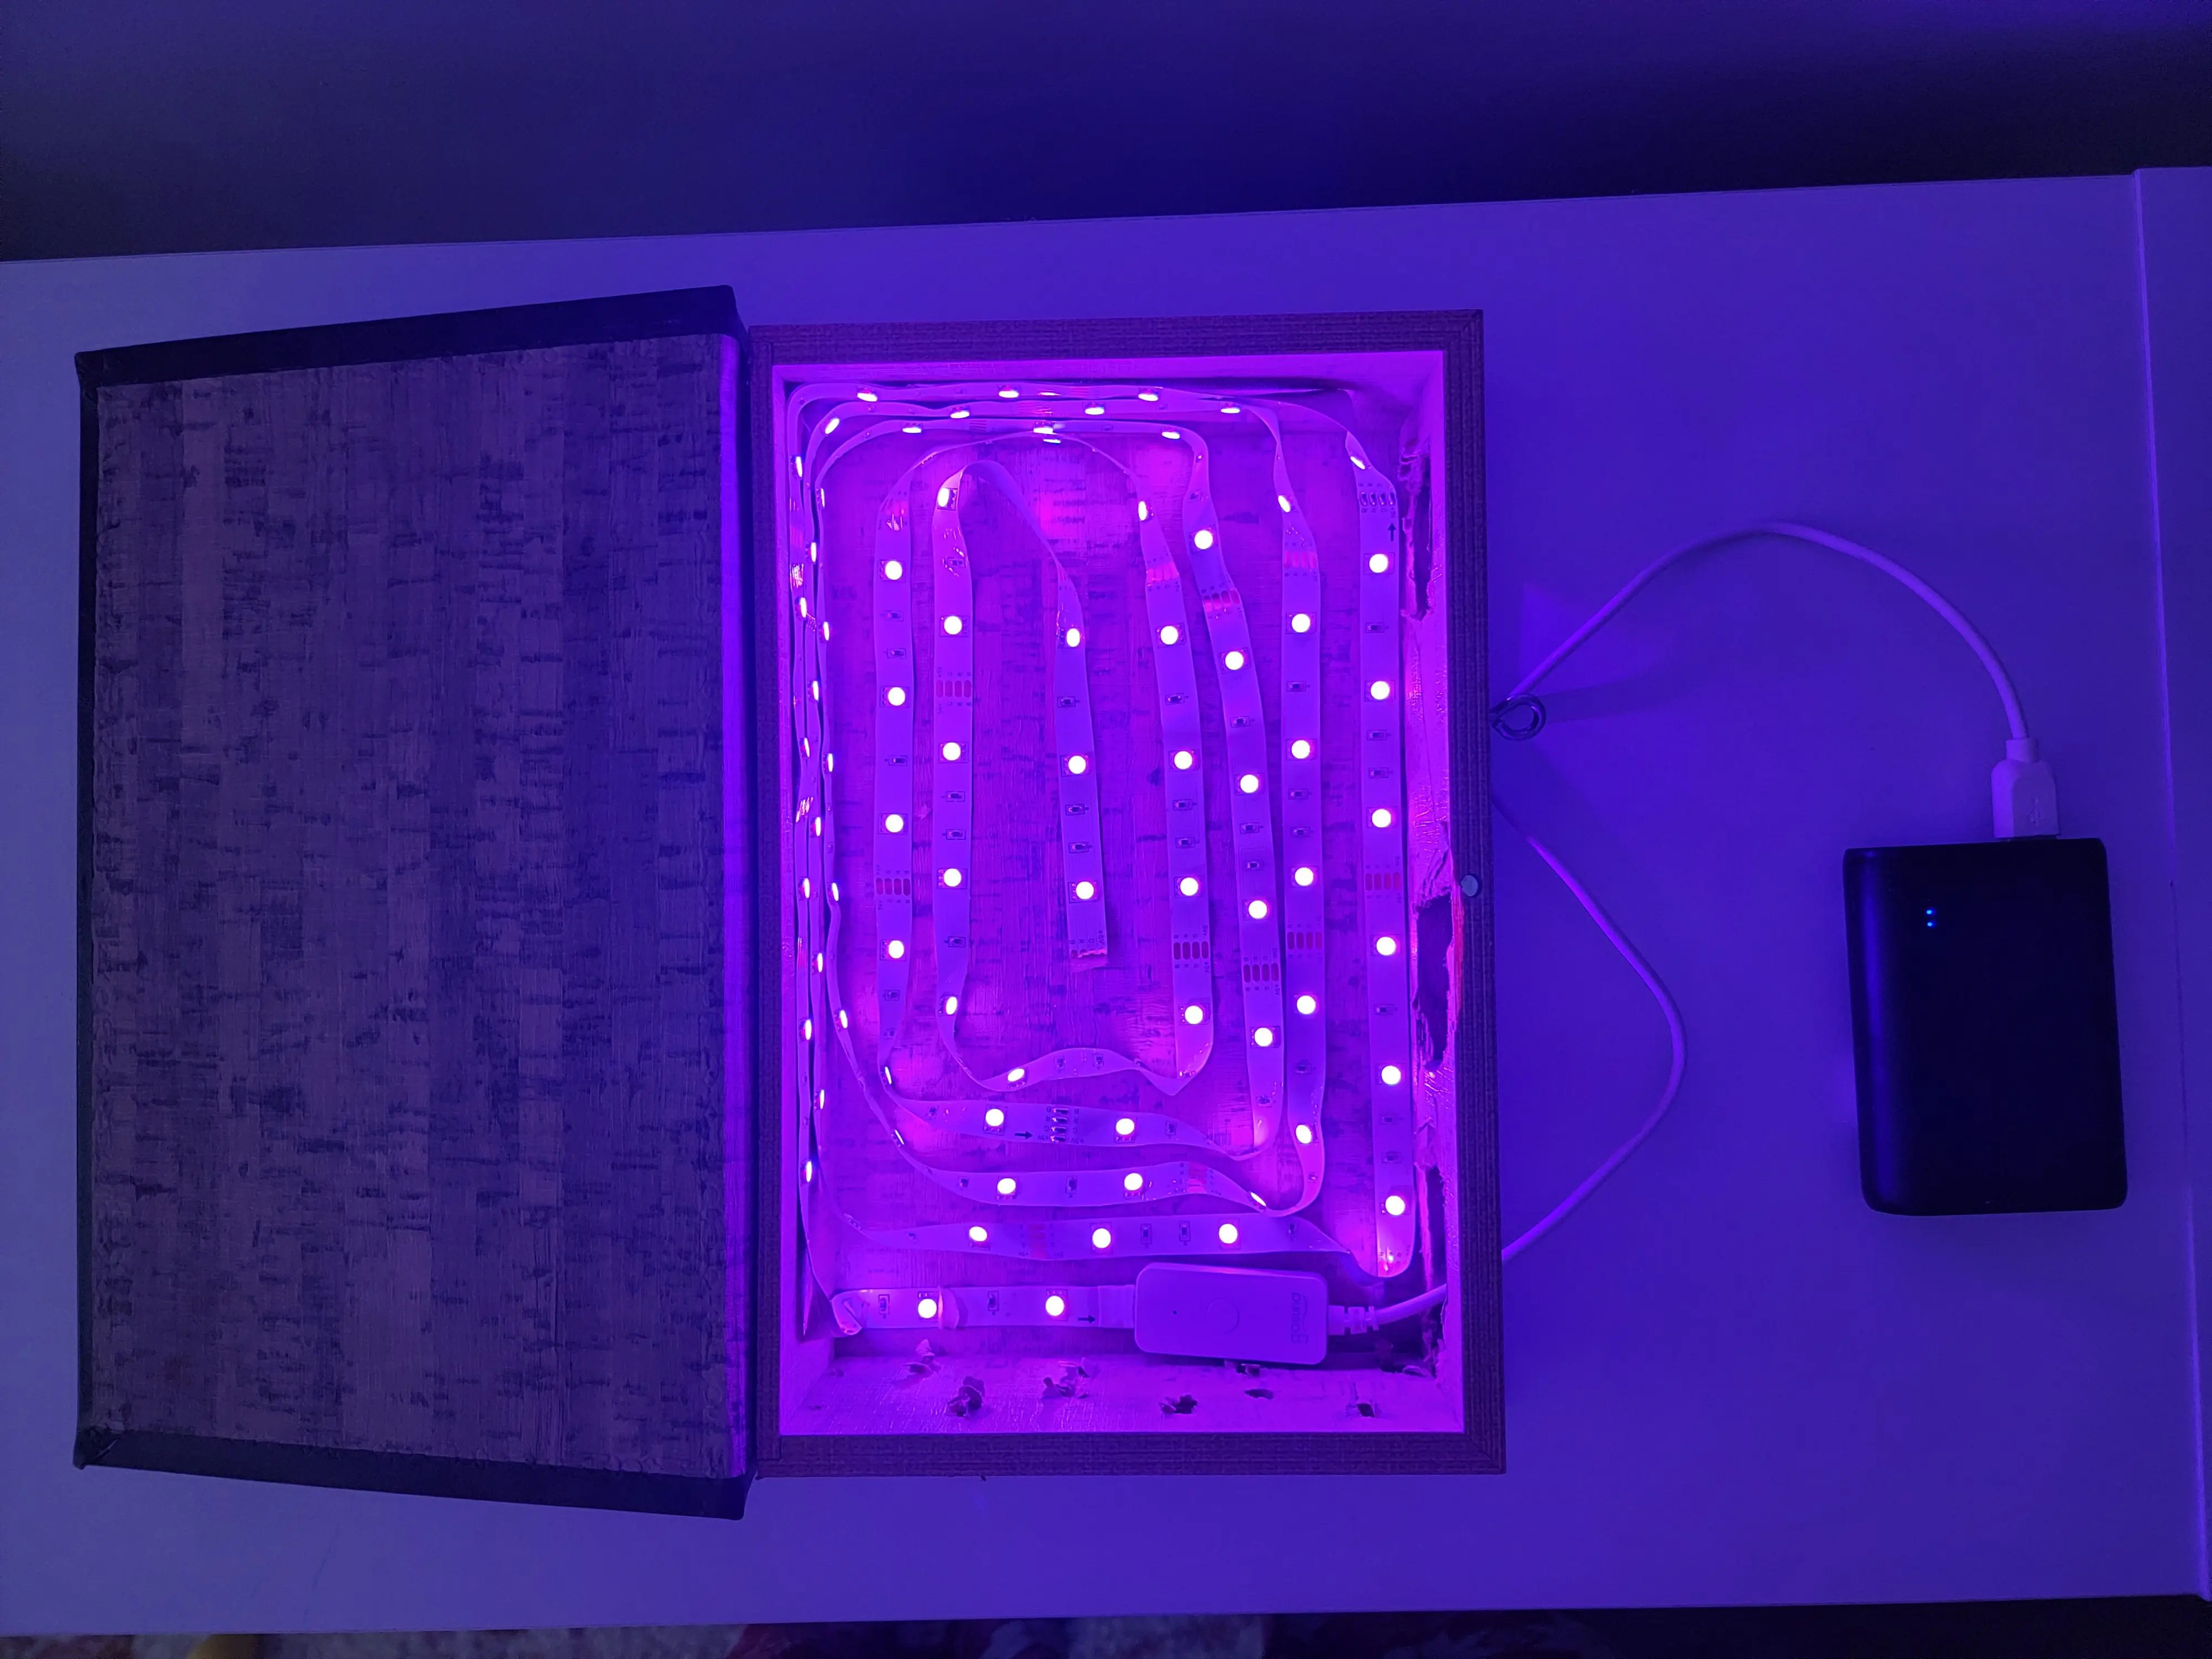
you can see the book latch glowing in the picture above
Read this step in entirety before starting. There may be differences in your hidden bookcase door that force you to change your approach.
Book Latch Materials
Fake Book
Eyehook
16 gauge wire
Push-button sound card
Chain Bolt
Steel Pipe (your choice on diameter) but I would keep it small. (optional)
90 degree “elbow” pipe
Two pieces of scrap wood.
How to make a book latch for a hidden door bookcase
Optional materials:
- Wifi USB powered LED strips (TV backlight)
- Push button sound card
- Metallic Copper spray paint
- Magnets
Book and Effect
My bookcase opens up into an unfinished portion of our basement. My Wife got the office and in exchange I negotiated to be able to do what I wanted with the unfinished space. So, I obviously decided to turn it into an arcade.
Because of this, I wanted the latch to incorporate the cheat code that every warm blooded 80’s baby knows – the Konami Code. I programmed google to run a series of commands based on the command “Up, Up, Down, Down, Left, Right, Left, Right, B, A, Start”.
- Saying the Konami Code turns off all of the lights in the basement except the one directly in front of the bookcase. If you don’t have WiFi controllable lights then I highly recommend looking at Phillips Color tunable lights. They are simple to install and much cheaper than the Philips Hue line.
- I “installed” (i.e., put a ball of) a usb powered WiFi LED strip lights inside of the book. These are incredibly cheap on amazon ($7.99). To power them, I had a spare portable charger laying around. I ran the power cable out of the back of the book and drilled a hole in the shelf so that I could run the charging wire under the shelf to hide the power bank. I then cut a few squares out of the front of the book (the part that faces the back of the bookcase, i.e., not the part you see when you look at the bookcase). It’s really up to you how many and how large you drill. I kept adding holes until I got the glow that I was looking for. Because the LED strip lights are WiFi enabled I was able to have these lights turn on when I said the Konami Code. This creates a glow around the book and indicates which one you need to pull to open the secret door.
I paid $21.99 for this book set but at the time of writing this is seems that the price fluctuates: https://amzn.to/3wWPrUL . I liked this option because the book was hollow with a solid outer shell. The solid outer shell allowed me to easily screw in a eyehook that I could then attach my wire.
3. To pay for this part of the bookcase door I actually decided to sell my Gold Edition Ocarina of Time N64 games. This is hands down my favorite game of all time and so to honor and incorporate it into the project I bought this sound recorder: https://amzn.to/3APqv2D
It took some trial and error but the push button version of this device worked perfect. I recorded the hidden door sound from Zelda and then tucked the card portion of the device under the book and taped it down. The little red button sits snugly under the lip of the book and out of sight.
It sits well enough that just a little nudge of the book will trigger the satisfying and classic sound. I couldn’t be happier with the result.
Book Placement
Placement of the book is critical in it functioning correctly. My door opens towards me, this means that the book needs to be placed on the right side (right when facing towards the bookcase). I also wanted it on a lower shelf so that my 2 year old could pull it by standing on a stool. You could place it on one of a few shelves but refer to my pictures to see what I determined to be optimal placement. You can not install the book on the left hand side but feel free to put other non latchy books wherever you want.
The book sits on the smallest hinge that I could find. The hinge fit perfectly inside the books lip. I screwed the hinge into the book first then the shelf. Check to make sure that you get good motion before you screw it in.
- Install an eyelet to the back of the book by marking the dead center of the fake book pages then move up an inch or two.
- Loop and twist two separate strands of 16 gauge wire through the eyelet with pliers. You really want to get these good and secure.
- Drill a hole through the back of the bookcase big enough to fit your 90 degree pipe. You want this hole to be directly in line with your eyehook. This is important, if the hole is too low or too high in comparison to the eyehook then you risk causing unnecessary friction on the wire. We are running two separate wires as a failsafe against one breaking.
Optional: I spray painted the elbow, pipe and the chain bolt copper. I really liked the way it came out. You could use copper pipe but we ain’t made of money and it wasn’t worth the price to me. If you want to do the same then you will want to spray paint the 90 degree elbow and chain bolt before the next step.
- Wedge your 90 degree elbow into the hole, making sure that the back end (backside of the bookcase) is pointing straight up.
Chain Bolt main body installation:
1. Toss aside the chain that comes with it, we wont be using it. Also, the chain bolt was too tight for my liking. To resolve this, I removed the spring and heated it up with a long nose lighter (I don’t know the real name, calm down). You could also use some tongs and your gas stove. Heat relaxes the springs tension. Do not overdo this, just do it a little bit at a time until the bolt moves smoothly.
To avoid unnecessary friction you want the pull portion of the chain bolt to be installed directly in line with the 90 degree pipe. You can use the steel wires as guidance but don’t attach them yet. Once you are certain the pull is in line with the 90 degree elbow secure the main body of the chain bolt to the back of the bookcase. I decided to add a piece of scrap wood between the back of the bookcase and the bolt – this made things more sturdy. This needs to be as close to the top of the bookcase as possible. This is because the bolt will be stretching up to a latch that will be mounted above it on some scrap wood.
2. Put your steel pipe into the end of the 90 degree elbow that is on the backside of the bookcase. I cut the pipe to be about an inch below the chain bolt and then spray painted it. If you did things right then the opening of the pipe should sit right below the pull of the chain bolt.
I used my Dewalt DW788 scroll saw https://amzn.to/3wn3KCs to cut the pipe but there are much simpler ways to do this, like a hacksaw. That being said I love my scroll saw – it gets a ton of nuanced jobs done for me and cuts like butter.
3. Now that the pipe is cut to length, run your wires from through the pipe and secure the pipe to the back of the bookshelf with pipe hanger straps. Twist the wires exactly one million times through the hole in the bolts pull. Okay, not a million but you want to make sure that this is an absurdly good and sturdy connection. It isn’t the end of the world if the wire comes off of the eyelet attached to the book (because you can still pull it) but if it detaches from the bolt you will have no way of opening the door and you may be forced to break the back of your bookcase to get to the latch.
4. Test the books functionality. You should be able to pull the book and have the bolt draw down. Make sure that the pipe is secure to the back of the bookcase and that the wires aren’t under unnecessary strain. You are pulling them through a 90 degree bend so expect some resistance. If the latch is still too tough then remove the spring and heat it up some more. In extreme cases you could heat then pull the spring but again this is irreversible. If you loosen it too much there is no going back. It’s best to try in small increments.
Chain Bolt – Latch installation:
1. The secret door latch needs to line up with the bolt. Because of the fear of locking myself out of the arcade I decided to mount the latch in a place where the bolt just grabs it enough to shut the door. The thought process is that in a worst case scenario I could probably shake it off of the latch.
2. This is where my unfinished wall helped me out a bit. I screwed a piece of scrap wood into the top of the stud above my doorway I then lined the latch up with the bolt and marked the second piece of scrap. I then screwed the two pieces together to create a bracket for the latch to screw into. I screwed the latch into the second piece of scrap wood in a place that allowed the bolt to catch it. Reference my pics and videos for help. This is another example where the 3D model might help you out.
If your wall is finished then you will need to change this part around a bit. You could cut into the drywall then patch up the hole around your scrapwood – you won’t see that part anyway. The point is that your latch needs to line up with the bolt that is screwed into the back of your bookcase door. The scrap wood serves as a means to hold the latch securely in that place. To state the obvious, the latch can not be a part of the bookcase, it needs to be mounted separately.
From the outside you will pull the book to open the door. From the inside you just need to reach up and release the bolt from the latch.
3. This is it, the grand finale. Pull your book and test the motion before you shut the door. I strongly suggest that you have help for this stage. You want someone tall enough to stay on the inside as a failsafe. I had my wife on the inside and I opened and closed the door a hundred times to make sure that things were right.
Note: I adjusted the latch a bunch of times. At first the door drifted a little away from the wall ruining the effect. I backed the latch up and lowered it enough to have the door “click” in. In fact, when you open or close my door it does make a little click sound. It now sits flush with the wall but for a little added comfort I added some magnets to the top of the door to help it make a clean seal.
You made it this far, let’s not get you locked out. Keep tinkering with the latch until it looks and feels right.
Molding cleans everything up and it hides the gaps as much as possible. We designed a secret door that comes towards us (technically a right hand outswing door). Because of this, we will nail two pieces of molding to the wall. The third piece will actually be nailed (and screwed) into the face frame.
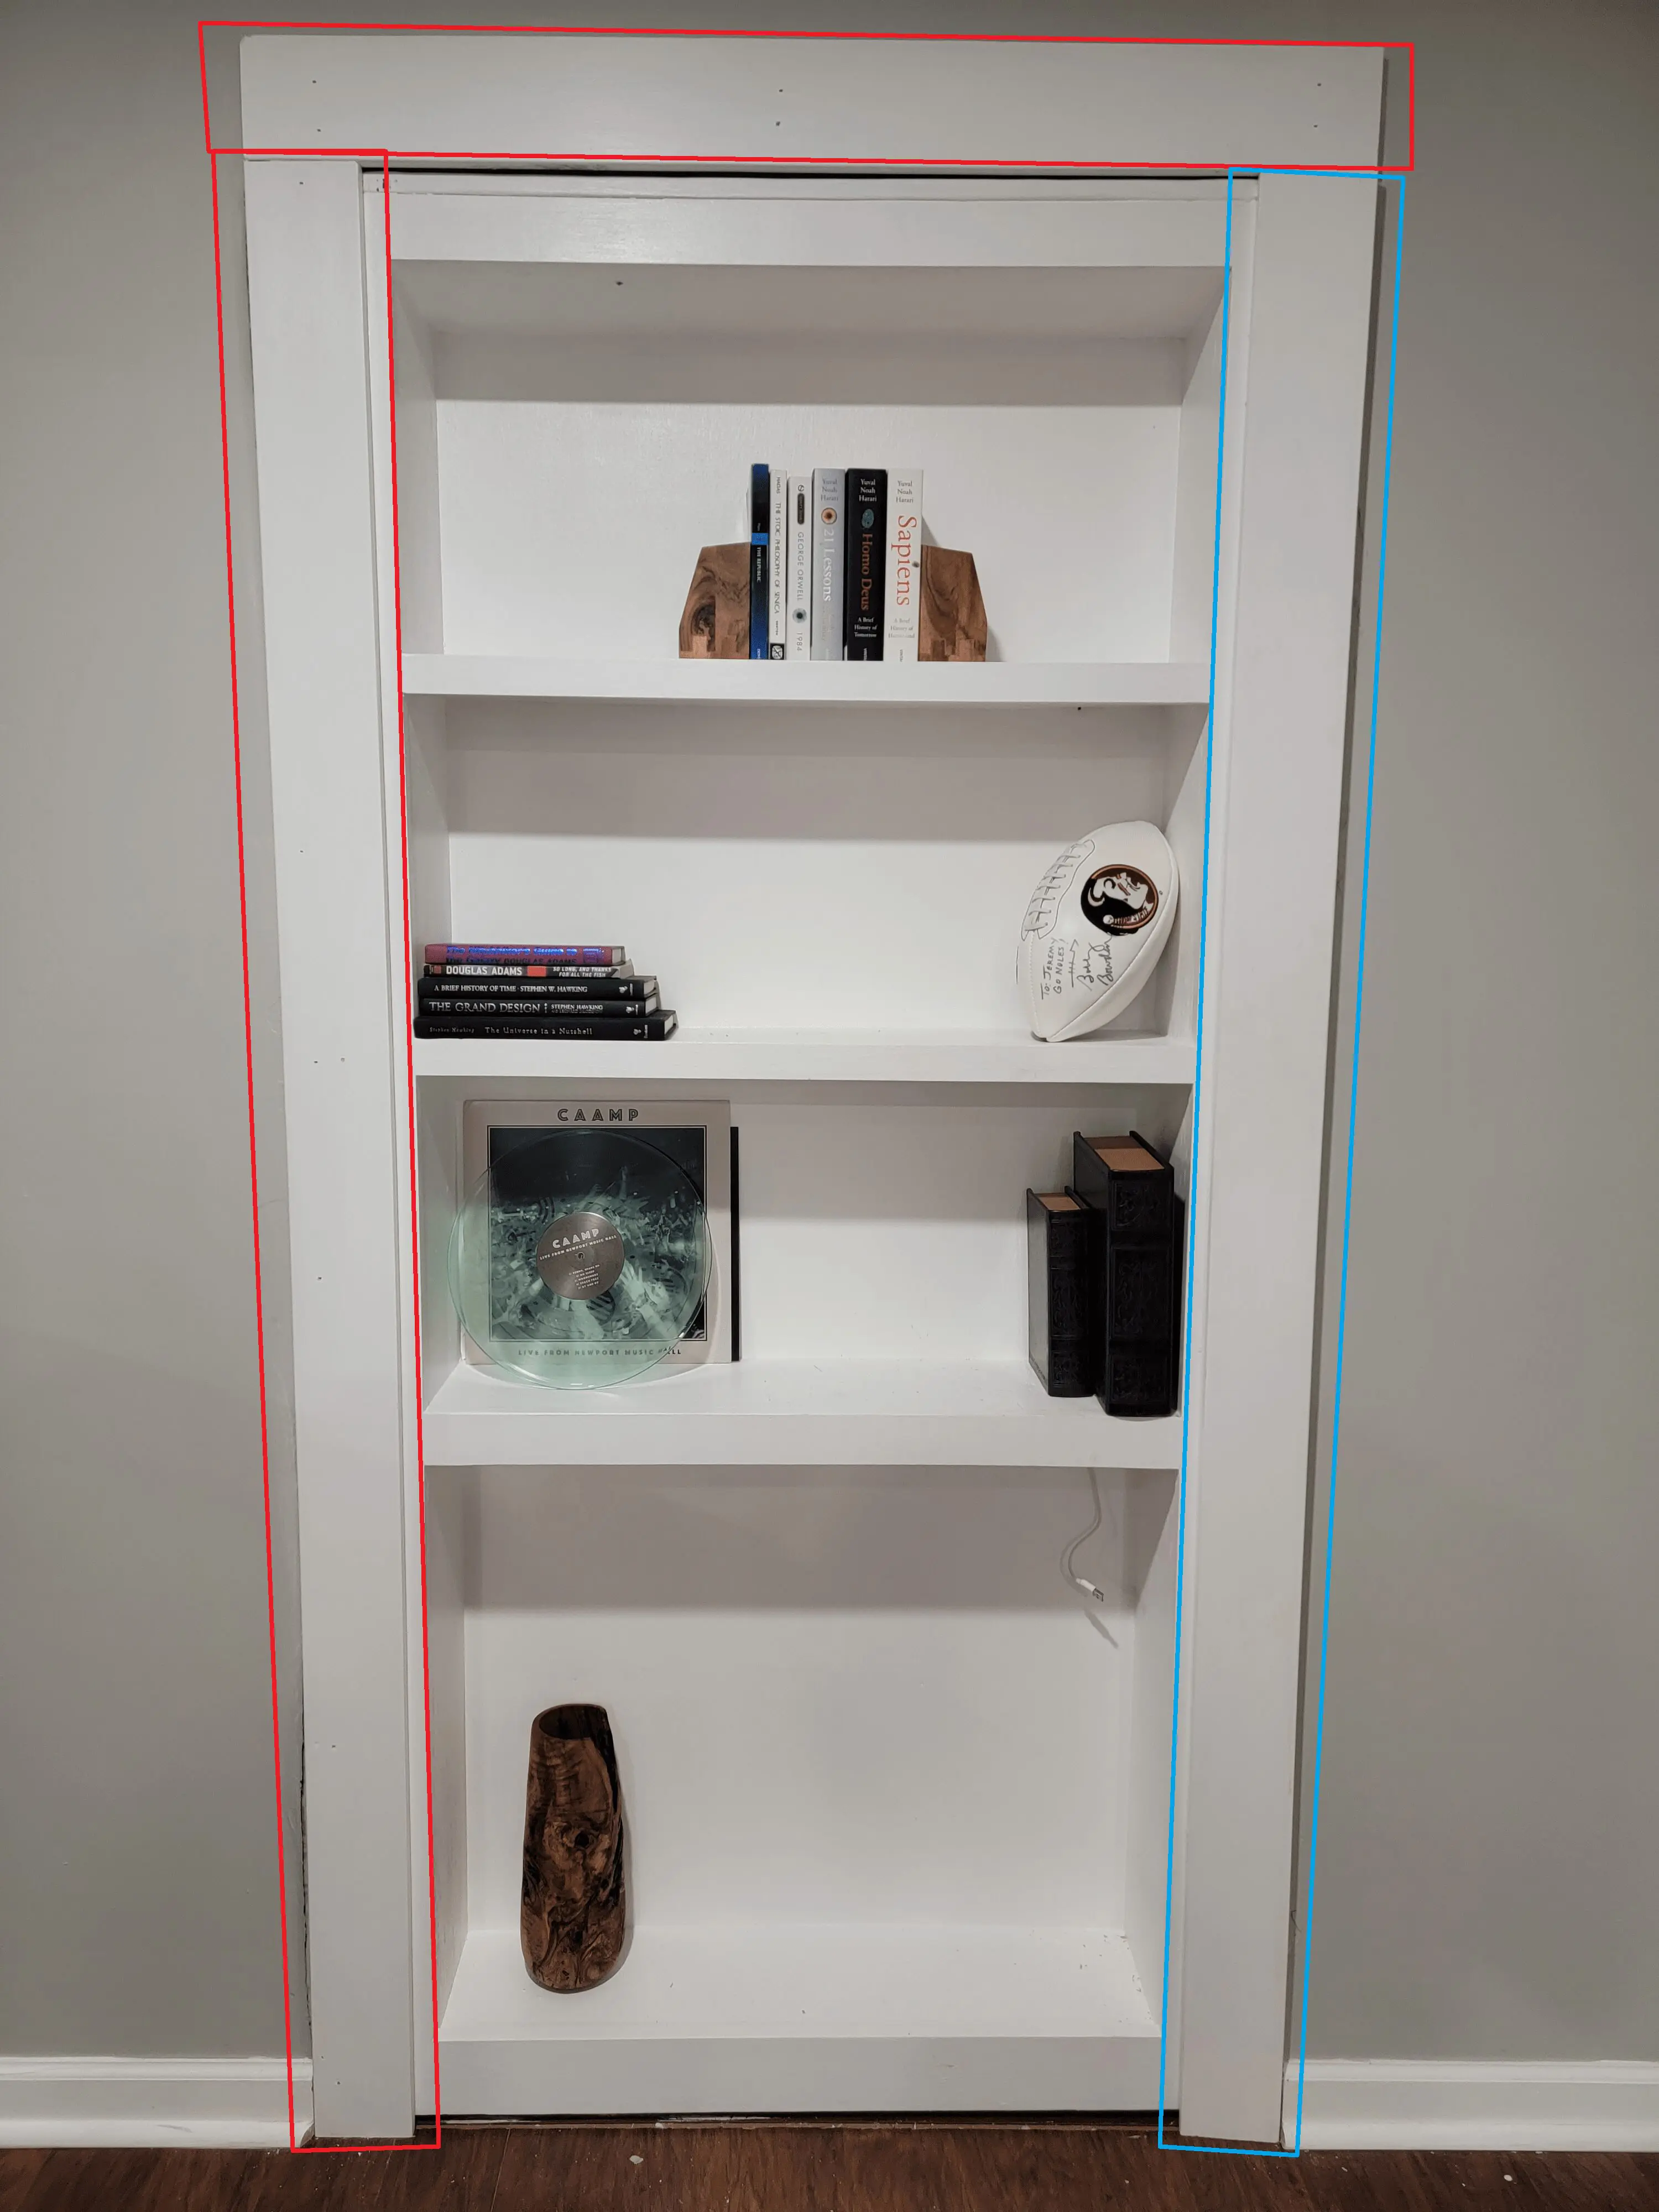
The molding highlighted in red is secured to the wall as you would with any other doorway. The molding in blue is secured to the bookcase itself. This is your time to clean up any gaps, being mindful to leave enough room for the door to swing open. Be sure to have the left and right molding cover the same amount of the face frame.

Notice how the molding on the right swings with the door itself.

Hidden Doorway Bookcase.
Hidden Door Bookcase: Let’s pretty up that back
Congratulations! The front of the hidden bookcase door is complete. You now have a fully functional secret bookcase door. The below link will take you to part 2, where we learn how to pretty up the most neglected part of a bookcase door on the internet – the back.
Next Up: Secret Bookcase Door Back
Click the picture above to learn how we built this beauty of a wall in an hour, for $20.
Hidden Doorway Bookcase.
Frequently Asked Questions (FAQs)
I have been asked dozens of really good questions regarding the secret bookcase door. Below I will summarize some of the most frequently asked ones.
Question 1: Can secret bookcase doors be soundproofed?
Answer: Yes, with proper insulation and construction techniques, they can be soundproofed to some degree.
Question 2: What are some design styles for secret bookcase doors?
Answer: Styles can range from modern minimalistic, traditional, to rustic. Your choice depends on the overall décor of your home. We chose a rustic back to go with the theme of the room behind it.
Question 3: What types of wood are best for a secret bookcase door?
Answer: Strong and durable woods like oak, maple, or cherry are often used, though the choice may also depend on your color and grain preferences. Try not to “cheap out” as your bookcase door is a functional piece of furniture. Not only does it need the durability of a bookcase but it also needs to be strong enough to handle constant motion.
Question 4: Can a secret bookcase door be motorized?
Answer: Yes, with additional hardware and expertise, a bookcase door can be automated. You can certainly replace the bolt latch with a fingerprint reader or keypad that unlocks the door.
Question 5: Is there a weight limit for a bookcase door?
Answer: The weight limit depends on the strength of the supporting wall and hinges. It’s important to keep the weight manageable to prevent strain on these components. The Tambee pivot hinge that we recommend has a weight limit of 110 pounds.
Question 6: Can I use a secret bookcase door in a rented property?
Answer: This depends on your lease agreement and whether the landlord allows for such modifications.
Question 7: Can a bookcase door also be fire-resistant?
Answer: Yes, with the use of fire-resistant materials and finishes, a bookcase door can be made to be more resistant to fire.
Question 8: How long does it take to install a secret bookcase door?
Answer: Installation time can vary widely based on the complexity of the project and your level of expertise. It could take anywhere from a day to a few weeks.
Question 9: Can I install a secret bookcase door on a non-load bearing wall?
Answer: Yes, but it’s crucial to ensure the wall can support the weight and movement of the door.
Question 10: Can secret bookcase doors be added to pre-existing door frames?
Answer: Yes, it’s possible to modify a pre-existing door frame to accommodate a bookcase door.
Question 11: What are some creative opening mechanisms for a secret bookcase door?
Answer: Some ideas include a disguised button, a hidden lever, a pull book, or even an electronic keypad.
Question 12: Can a secret bookcase door be integrated with home security systems?
Answer: Yes, many people choose to integrate their secret doors with their existing home security systems.
Question 13: How can I disguise the seams of a secret bookcase door?
Answer: The best way to hide the seams of a secret bookcase door is to line the molding up as instructed in our DIY plans.
Question 14: What are some alternative secret doors if I can’t install a bookcase door?
Answer: Hidden doorway options include hidden wall panels, mirrors, paintings, or even a faux stone wall.
I’m going to Level with you….
Like woodworking, I am learning how to design this website design as I go. One thing that helps a website gain attention is posting “short and sweet” articles, fun fact – humans are also inclined to look at lists first (that’s one reason why you see “Top ten TVs” or “Five must see living room makeovers”). If you have made it this far then you are a trend bucker, you also have realized that I don’t do short and sweet. That ish is for the birds, and you know what cats do to birds….
I support you and all of your dreams, however, if this page gets any longer those human brain picking robots may shove this super cool article so far down in the rankings that people like you never get to see it (go tell some friends, thanks).
For this reason, I think it is a logical place to end this part of the DIY Hidden Doorway Bookcase build.
Part 2 focuses on something that almost every other hidden bookcase builder neglects – THE OTHER SIDE OF THE DOOR.
That’s right. Believe it or not, the hidden doorway bookcase has a back that people will inevitably see. Typically, these backs lack wow factor and are forced to listen to people compliment how cool the other side is, while they sit hidden away.
NOT TODAY Click above to access Part 2 of the Hidden Bookcase Door build – I will show you how a Facebook marketplace treasure find resulted in the completion of what might be my favorite part of the Arcade Bar (named BarKode, you were paying attention above – right?)


